
Manual


8 Amico Accessories Inc.
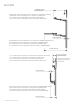
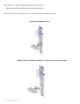
Mounting Preparation
The Condor comes with a set of channel covers. Remove the central channel cover to expose all 7 wall
mounting holes.
Mounting on wall with studs/backing:
NOTE: Depending on whether a single or double SSM arm is used, the mounting height of the Condor Channel will
change. This is because in a double SSM, the keyboard tray and monitor head is 2" (5.08 cm) higher due to the layering
of the arms.
1. Locate and mark the top mounting hole at a distance of 69"/168 cm from the oor for a conguration using single
SSM arms, and 71"/180 cm from the oor for a conguration using double SSM arms.
2. Drill a 9/64" (0.35 cm) diameter hole and secure one ¼ -20 x 2 ½ (0.635 - 50.8 cm x 6.35 cm) tapping screws.
3. Hang the top mounting hole of the Condor (key-hole style) to this screw.
4. Mark remaining 6 holes as shown in Figure 2, checking to ensure Condor is plumb, ush and level.
5. Secure the Condor using remaining ¼ -20 x 2 ½" (0.635 - 50.8 cm x 6.35 cm) tapping screws.
6. Correctly installed Condor should be ush against the wall and will not wobble side to side or up and down. If your
Condor is behaving dierently please contact an Amico Accessories Inc. Product Specialist at 1-877-264-2697.
SECTION 3:
Installation on Wall
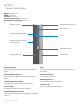
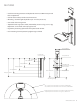
Cable Management
Channel Cover
Mount bottom of Condor Channel
27" (2 ¼ feet) (68.58 cm) from oor,
to provide a seated 28" (71.12 cm)
keyboard height to standing 45"
(114.3 cm) keyboard height for a
single SSM Arm. Mounting distance
changes to 25" (63.5 cm) when
using a keyboard tray with a double
SSM Arm.
2 ¼ feet (68.58 cm)
Floor
Gas Spring Cover
Location of top
mounting hole
Central Channel Cover
Location of bottom
mounting holes