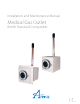
Installation and Maintenance Manual Medical Gas Outlet British Standard Compatible w w w . a m i c o .
Table of Contents Product Description Cleaning and Lubrication Inspection and Testing Installation & Dimensions Flush Mount Console Mount Surface Mount Service Preventive Maintenance Latch-Valve Assembly AGSS Latch Valve Assembly AGSS Flow Control Adjustment Rough-In Assembly-Flush, Console and Surface Mount Model Numbers Latch-Valve Assembly Rough-in Assembly Complete Outlets Gas Indexing Replacement Components Latch Valve Assembly AGSS Replacement Components Rough-In 2 Amico Pipeline 3 3 4 4-7 5 6 7 8
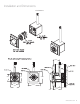
Product Description The Amico Medical Gas British Outlet is composed of two separated modules: the “Rough-in assembly” and the “Latchvalve assembly”. The “Rough-in assembly” consists of a brass machined body that incorporates a spring loaded check assembly. A 12.7 mm OD, 9.52 mm ID copper pipe is sliver brazed into the body for external pipeline connections. The brass body and pipe assembly are inserted into a gas specific plate.
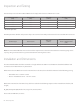
Inspection and Testing Pressure drops across the Amico British Outlet shall comply with clause 6.3 of BS EN 737-1:1998. Nominal Pressure (kPa) Test Pressure (kPa) Test Flow (1/min) EN 737-1 Limit (kPa) 400 320 60 15 400 320 200 70 700 640 300 70 Vacuum *40 40 15 * Absolute pressure AGSS Requirements for flow and pressure drop across terminal units with probe inserted clause 5.4.
Installation and Dimensions Flush Mount 58mm 80mm 58mm 102mm 58mm 80mm 102mm 22mm 73mm www.amico.
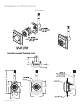
Installation and Dimensions Console Mount 53mm 29mm 229mm 92mm 83mm 46mm 73mm 6 Amico Pipeline 102mm 102mm 64mm
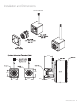
Installation and Dimensions Surface Mount 72mm 80mm 58mm 58mm 80mm 8mm 88mm www.amico.
Preventative Maintenance Regular inspection and maintenance of the Outlets will prolong its life and reduce the possibility of sudden, inconvenient component failures. The use of damaged probes or faulty equipment may require further maintenance. Outlets should be subjected to regular inspection and testing as follows: Monthly; a. Visually inspect the Outlet for signs of damage. b. Check to see if the Front Latch Assembly (2nd Fix) operates smoothly with the gas specific probe. c.
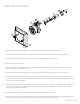
Latch Valve Assembly 10 11 9 5 7 8 6 4 1 3 2 1. Unscrew the two Trim Plate screws (1), and remove Trim Box Plate (2) and the Trim plate (3). 2. Unscrew the two Retaining screws (5) until the Latch Valve Assembly (4) can be removed from the Outlet. 3. Remove the two Retaining washer screws (11), and remove the Retaining washer (10). 4. Remove the gas connector (9) 5. Remove the Body Seal (6) and Poppet (7) from the front of the Gas Connector (9).
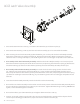
AGSS Latch Valve Assembly 11 12 10 9 7 5 8 6 4 1 3 2 1. Unscrew the two Trim Plate screws (1), and remove Trim Box Plate (2) and the Trim plate (3). 2. Unscrew the two Retaining screws (5) until the Latch Valve Assembly (4) can be removed for the Outlet. 3. After removing the Latch Valve Assembly (4) from the Outlet, you can then pull the Check Valve Body Assembly from the back side of the Latch Valve Assembly (4).
AGSS Flow Control Adjustment www.amico.com Reference Part Numbers: O-BSQ-REC-AGS O-BSQ-CON-AGS O-BSQ-SUR-ARS A.G.S.S. Threaded Nose Valve Flow Control Screw (3mm Allen Key) Surface Mount Box British Standard A.G.S.S. 1. Insert a 3 mm Allen Key into the front of the Check Valve. 2. Adjust the Flow Control Screw to desired setting. www.amico.
Rough In Assembly CAUTION: Ensure that the supply pressure is shut off before performing service. Inside the “Rough-in assembly” is a secondary check valve whose function is to shut off gas flow when the “Latch-valve assembly “is removed. This seat/seal also prevents leakage around the latch valve connector. As the secondary seal is only a static seal, it will rarely need replacement.
Model Numbers Flush Mounted Latch Valve Assembly Rough-in Assembly Complete Assembly Oxygen O-FASC-BSQ-OXY O-BAKBSQ-OXY O-BSQ-REC-OXY Medical Air (400 kPa) O-FASC-BSQ-MA4 O-BAKBSQ-MA4 O-BSQ-REC-MA4 Medical Air (700 kPa) O-FASC-BSQ-MA7 O-BAKBSQ-MA7 O-BSQ-REC-MA7 Vacuum O-FASC-BSQ-VAC O-BAKBSQ-VAC O-BSQ-REC-VAC Nitrous Oxide O-FASC-BSQ-N2O O-BAKBSQ-N2O O-BSQ-REC-N2O Anesthetic Gas Scavenging System O-FASC-BSQ-AGS O-BAKBSQ-AGS O-BSQ-REC-AGS Console Mounted Latch Valve Assembly Rough
Gas Indexing As seen from the front of the “Rough-In Assemblies” VACUUM OXYGEN NITROUS OXIDE MEDICAL AIR 400 kPa MEDICAL AIR 700 kPa 14 Amico Pipeline AGSS
Replacement Components Latch Valve Assembly 10 11 9 5 7 8 6 4 1 3 2 Item Description Model Numbers 1 Trim Plate Screws (2 required) H-STPP-6150AB 2 Trim Box Plate O-X-BSQC-BOX625 3 Trim Plate O-X-BSQC-TRIM 4 British Standard Latch-Valve See Above 5 Outlet Mounting Screws (2 required) H-MPP-0616SS 6 Body Seal O-X-OXE-SEAT* 7 Poppet for Body O-X-BSQC-POPET* 8a Spring for All Gases (except Vac.
Replacement Components AGSS Replacement 11 12 10 9 7 5 8 6 4 1 3 2 Item Description 1 Trim Plate Screws (2 required) H-STPP-6150AB 2 Trim Box Plate O-X-BSQC-BOX625 3 Trim Plate O-X-BSQC-TRIM 4 British Standard Latch-Valve See Above 5 Outlet Mounting Screws (2 required) H-MPP-0616SS 6 AGSS Check Valve O-X-BSQC-CHKVLV 7 Flow Adjustment Screw H-HSSS-CPM601-6SS 8 Locking Screw H-HSSS-CPM601-6SS 9 AGSS Check Valve Spring O-X-BSQC-VLV-SPR* 10 Check Valve Body Seal H-ORING-0
Replacement Components Rough In Assembly Item 1 2 3 4 5 6 7 Description Retaining Ring Washer Seat/Seal Secondary Check Valve Secondary Check Valve Spring Console Rough-in Assembly Flush and Surface Mount Rough-in Assembly Model Numbers O-X-BAK-RETAI* H-WASH-895-SS* O-X-BAK-SEAT* O-X-BAK-CHECK* O-X-BAK-SPRING* See Above See Above Note: Suction inlets (Vacuum and AGSS) are not supplied with Secondary Check Valves. The Secondary Check Valve (4) and Secondary Check Valve Spring (5) are not required.
www.amico.com Amico Pipeline | www.amico.com 85 Fulton Way, Richmond Hill Ontario, L4B 2N4, Canada Toll Free Tel: 1.877.264.2697 Toll Free Fax: 1.866.440.4986 Tel: 905.763.7778 Fax: 905.763.8587 Email: info@amico.