
Operation Manual

51
OPERATION
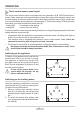
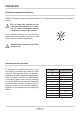
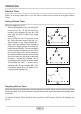
Touch control sensor panel layout
• Immediatelyaftertheapplianceisconnectedtoelectricalmains,alldisplayswilllightup
briefly. Your induction hob is then ready for use.
• The induction hob is equippedwith electronic touch controlsensorfields, which are
operated by touching with a finger for at least 1 second.
• Touchingofasensorfieldisaccompaniedbyanacousticsignaltoacknowledge.
No objects should be placed on the sensor elds (this could cause an error). Touch
sensor elds should be always kept clean.
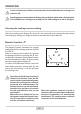
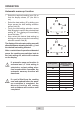
Switching on the cooking zones
Oncetheapplianceisswitchedonusingthe
on/offsensoreld(1), select a cooking zone
(3) within the next 20 seconds.
1. When a cooking zone selection sensor
eld(3) is touched (3), the relevant heat
setting indicator display shows „0” and a
dot.
2. To select the desired heat setting, slide
yourngeracrosstheheatselectionsen-
soreld(2).
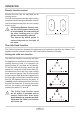
Switching on the appliance
To switch on the appliance touch and hold the
on/offsensoreld(1) for at least 1 second.
The appliance is switched on and the LED
pilot light comes on above the on/off sensor
eld(1) while all displays (3, 4) show „0” and
decimalpointisashing.
If none of the sensor elds is to-
uched within 20 seconds, the ap-
pliance switches itself off.
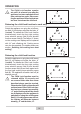
Thetouchcontrolsensorpanelisequippedwithnewgeneration(3,4) „DIGI Select-Sensor”
sensorelds,wherethecookingzonedisplayisalsothecookingzoneselectionsensorand
the timer display is the timer selection sensor. Heat setting selection sensor (2) is a slider type
touch control sensor allowing selection of heat setting (1-9) and timer setting (1-99) by touching
andslidingyourngeracrossthemarkedarea(2):
- sliding right - increase the heat setting
- sliding left - reduce the heat setting.
It is also possible to select the heat setting directly by touching the appropriate part of the heat
settingselectionsensoreld(2).
4
3
3
1
1
2
3