
Instructions / Assembly


21
ameriwoodhome.com
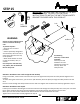
STEP
15
Tube
You
IMPORTANT: THIS UNIT MUST BE SECURE TO THE WALL
TO HELP PREVENT TIPOVER. FOLLOW THESE
INSTRUCTIONS TO INSTALL THE ANTI-TIPPING SAFETY
BRACKET PROVIDED WITH THIS PRODUCT.
stud
wallboard
hole
WARNING
Seriousorfatalcrushinginjuries
canoccurfromfurnituretip
over.
Topreventtipover:
*Installtipoverrestraint
provided
*Unlessspecificallydesignedto
accommodate,donotsetTVsor
otherheavyobjectsonthetop
ofthisproduct
*Neverallowchildrentoclimb
orhangondrawers,door,
or
shelves
Useoftipoverrestraintsmay
onlyreduce,butnoteliminate
theriskoftipover
OPTION1:Attachmentintoawallstud(preferredmethod)
Usingastudfinder,locateastudinthewall.Placeyourunitagainstthewall,withthesafetybracketalignedinthis
location.
To
makedrivingthescreweasier,youcandrilla1/8"diameterpilothole(3mm)throughthesafetybracketintothe
stud.
Drivethescrewthroughthesafetybracketintothewallstud.Tightenthescrewthatwasnotfullytighenedinstep6.
OPTION2:Attachmentintodrywall
Locateyourunit
wheredesiredagainstawallandmarkthewallthroughthesafetybracket,thenmoveyourunitaside.
Drilla3/16"diameterhole(5mm)intothewallboard.Tapthewallanchorintotheholeuntilitisflush.
Moveyourunitintolocationandfastenthewallbrackettothewall
anchorwiththescrew.
Tightenthescrewthatwasnotfullytightenedinstep6.
ForMasonry,
Concrete,orotherwall
materials:
Consultyourlocal
hardwarestorefor
appropriateanchorsto
securelyattachthe
safetybracket.
(x1)
#A84050
15c
15d
15c
15d