
Instructions / Assembly


18
ameriwoodhome.com
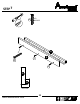
STEP12
Tube
You
OPTION1:Attachmentintoawallstud(preferredmethod)
Usingastudfinder,locateastudinthewall.Placeyourunitagainstthewall,withthesafetybracketalignedin
thislocation.Tomakedrivingthescreweasier,youcandrilla1/8"diameterpilothole(3mm)throughthesafety
bracketintothestud.
Drivethescrewthroughthesafetybracketintothewallstud.Tightenthescrewthat wasnotfullytighenedin
step8.
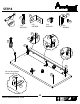
OPTION2:Attachmentintodrywall
Locateyourunitwheredesiredagainstawallandmarkthewallthroughthesafetybracket,thenmoveyourunit
aside.Drilla3/16"diameterhole(5mm)intothewallboard.Tapthewallanchorintotheholeuntilitisflush.
Moveyourunitintolocation
andfastenthewallbrackettothewallanchorwiththescrew.Tightenthescrew
thatwasnotfullytightenedinstep8.
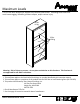
WARNING
Seriousorfatalcrushinginjuriescan
occurfromfurnituretipover.
Topreventtipover:
*Installtipoverrestraintprovided
*placeheaviestitemsinthelowest
drawers
*Unlessspecificallydesignedto
accomodate,donotsetTVsorother
heavyobjectsonthetopofthis
product
*Neverallowchildrentoclimb
or
hangondrawers,door,orshelves
*Neveropenmorethanonedrawer
atatime
Useoftipoverrestarintsmayonly
reduce,butnoteliminatetheriskof
tipover
IMPORTANT:THISUNITMUSTBESECURETOTHEWALLTOHELPPREVENTTIPOVER.
FOLLOWTHESEINSTRUCTIONSTOINSTALLTHEANTI‐TIPPINGSAFETYBRACKETPROVIDED
WITHTHISPRODUCT.
stud
wallboard
hole
9c
9d
ForMasonry,Concrete,orotherwall
materials:
Consultyourlocalhardwarestorefor
appropriateanchorstosecurelyattach
thesafetybracket.
9c
9d