9837222COM DESK B349837222COM0 Date of Purchase ___ / ___ / ___ Lot Number: THIS INSTRUCTION BOOKLET CONTAINS IMPORTANT SAFETY INFORMATION. PLEASE READ AND KEEP FOR FUTURE REFERENCE. Do Not Return This Product! Contact our customer service team for help first. Call: 1‐800‐489‐3351 (toll free) Monday‐Friday 9am ‐ 5pm CST Visit: www.ameriwoodhome.com WARNING ‐ Unit can tip over causing severe injury or death. ‐ Anchor unit to stud in wall (if instructed to). ‐ Do Not allow children to climb on unit.
Contact Us! Do NOT return this product! Contact our friendly customer service team first for help. Assembly Tips Call us! 1‐800‐489‐3351 Monday‐Friday 9am ‐ 5pm CST Visit ameriwoodhome.com to view the limited warranty valid in the U.S. and Canada. You Tube Helpful Hints PEOPLE NEEDED FOR ASSEMBLY: 1‐2 ESTIMATED ASSEMBLY TIME: 1 HOUR ‐ Open your item in the area you plan to keep it to avoid excessive heavy lifting. ‐ Identify, sort and count the parts before attempting assembly.
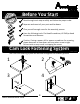
k Quic bly em Ass Ti p Before You Start Read through each step carefully and follow the proper order Separate and count all your parts and hardware Give yourself enough room for the assembly process Have the following tools: Flat Head Screwdriver, #2 Phillips Head Screwdriver and Hammer Caution: If using a power drill or power screwdriver for screwing, please be aware to slow down and stop when screw is tight. Failure to do so may result in stripping the screw.
Board Identification Not actual size C A E Left Partition 39837222030 B D Left Panel 39837222010 F Left Front Panel 39837222060 Modesty Panel 39837222050 Right Partition 39837222040 Right Panel 39837222020 H G Top 39837222080 Right Front Panel 39837222070 K I x2 Front Leg 39837222110 Drawer Front 39837222090 DRW BACK Drawer Back 39991070044400B ameriwoodhome.
Board Identification Not actual size LEFT DRW SIDE RIGHT DRW SIDE Right Drawer Side 39991070346010R Left Drawer Side 39991070346010L H D E C F L G Drawer Sides and Drawer Back are labeled with part description. B K RIGHT DRW SIDE DRW BACK L A M K ameriwoodhome.
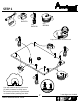
Part List Actual Size 2 1 (x16) #A22570 3 (x8) #A11600 (x8) #A22920 (x16) #A22510 cam lock 6 4 (x8) #A243222 (x18) #A21660 1-1/4" flat head connector cam bolt 5 cam cover wood dowel 10 7 8 (x8) #A22910 connector bolt 11 9 (x10) #A11080 (x4) #A12120 7/16" flat head (x2) #A54203 7/16" pan head drawer bracket (x2) #A17400 7/8" bolt Not Actual Size 14a Left Cabinet Member 12 14b 13 Right Cabinet Member 14c Left Drawer Member 14d (x1) #A52925 handle ameriwoodhome.
STEP 1 2 1 3 (x4) #A22570 (x2) #A22920 (x4) #A22510 Quick Assembly Tip 2 Proper orientation of CAM LOCK 1 2 A 1 3 2 You will need to tap the connector (3) with a hammer to fully insert. Be sure the connector is positioned as shown before pushing into hole. ameriwoodhome.
STEP 2 2 1 3 (x4) #A22570 (x2) #A22920 (x4) #A22510 Quick Assembly Tip 2 1 Proper orientation of CAM LOCK 2 B 1 3 2 You will need to tap the connector (3) with a hammer to fully insert. Be sure the connector is positioned as shown before pushing into hole. ameriwoodhome.
STEP 3 13 5 (x1) #A99040 (x8) #A21660 5 A Fill each dowel hole approximately 1/3 full with glue. Press the dowels into the holes as shown. Note: There should be some glue squeeze out as the dowels are inserted. Keep a damp cloth at hand to wipe this up as you assemble the cabinet. ameriwoodhome.
STEP 4 13 5 (x1) #A99040 (x8) #A21660 5 B Fill each dowel hole approximately 1/3 full with glue. Press the dowels into the holes as shown. Note: There should be some glue squeeze out as the dowels are inserted. Keep a damp cloth at hand to wipe this up as you assemble the cabinet. ameriwoodhome.
STEP 5 2 (x4) #A22510 2 K L 2 ameriwoodhome.
STEP 6 13 (x1) #A99040 UNLOCK LOCK K A L Parts to be flush this end Fill each dowel hole approximately 1/3 full with glue. Press the dowels into the holes as shown. Note: There should be some glue squeeze out as the dowels are inserted. Keep a damp cloth at hand to wipe this up as you assemble the cabinet. ameriwoodhome.
STEP 7 2 (x4) #A22510 2 K L 2 Fill each dowel hole approximately 1/3 full with glue. Press the dowels into the holes as shown. Note: There should be some glue squeeze out as the dowels are inserted. Keep a damp cloth at hand to wipe this up as you assemble the cabinet. ameriwoodhome.
STEP 8 13 (x1) #A99040 LOCK UNLOCK L B K Parts to be flush this end Fill each dowel hole approximately 1/3 full with glue. Press the dowels into the holes as shown. Note: There should be some glue squeeze out as the dowels are inserted. Keep a damp cloth at hand to wipe this up as you assemble the cabinet. ameriwoodhome.
STEP 9 1 (x6) #A22570 1 E Quick Assembly Tip Proper orientation of CAM LOCK 1 ameriwoodhome.
STEP 10 1 (x2) #A22570 13 5 3 (x2) #A21660 (x1) #A99040 (x4) #A22920 Fill each dowel hole approximately 1/3 full with glue. Press the dowels into the holes as shown. Note: There should be some glue squeeze out as the dowels are inserted. Keep a damp cloth at hand to wipe this up as you assemble the cabinet. 1 F G 5 C D 3 You will need to tap the connector (3) with a hammer to fully insert. Be sure the connector is positioned as shown before pushing into hole. ameriwoodhome.
STEP 11 7 (x8) #A22910 7 H ameriwoodhome.
STEP 12 4 (x4) #A11600 G 4 D C F H 3 turn the screw clockwise to lock in place ameriwoodhome.
STEP 13 13 (x1) #A99040 LOCK UNLOCK K L B Fill each dowel hole approximately 1/3 full with glue. Press the dowels into the holes as shown. Note: There should be some glue squeeze out as the dowels are inserted. Keep a damp cloth at hand to wipe this up as you assemble the cabinet. H E 3 turn the screw clockwise to lock in place ameriwoodhome.
STEP 14 13 (x1) #A99040 LOCK UNLOCK Fill each dowel hole approximately 1/3 full with glue. Press the dowels into the holes as shown. Note: There should be some glue squeeze out as the dowels are inserted. Keep a damp cloth at hand to wipe this up as you assemble the cabinet. B K E L A 3 turn the screw clockwise to lock in place ameriwoodhome.
STEP 15 14a Left Cabinet Member 8 (x1) #A56770 14b Right Cabinet Member (x6) #A11080 C D C 8 ameriwoodhome.
STEP 16 10 (x2) #A54203 Lay the drawer sides down on a flat hard surface. Carefully line up the drawer bracket with the holes in the drawer side as shown. Using a hammer, tap each drawer bracket stem part way into each hole. Repeat this process until the drawer bracket is fully seated on the drawer side. RIGHT DRW SIDE 10 LEFT DRW SIDE 10 finished edge ameriwoodhome.
STEP 17 9 finished edge (x4) #A12120 LEFT DRW SIDE 9 finished edge 9 RIGHT DRW SIDE e sh if ni ameriwoodhome.
STEP 18 4 4 (x4) #A11600 ra a urf s w ce finished edge DRW BACK 4 Drawer Bottom raw surface ameriwoodhome.
STEP 19 8 14c Left Drawer Member (x4) #A11080 14d Right Drawer Member (x1) #A56770 12 11 (x1) #A52925 (x2) #A17400 marked with an "R" 8 11 14d 12 8 14c marked with an "L" ameriwoodhome.
STEP 20 6 cabinet member roller (x8) #A243222 drawer runner roller 1 ameriwoodhome.
Maximum Loads This unit has been designed to support the maximum loads shown. Exceeding these load limits could cause sagging, instability, product collapse, and/or serious injury. 100 lbs 45.1 kg 15 lbs 6.8 kg Warning: Risk of injury to persons ‐ do not place a television on this furniture. This furniture is not approved for use with a television. Certificate of Conformity 1. This certificate applies to the Dorel Home Furnishings, Inc. product identified by this instruction manual. 2.
Register your product to receive the following: * New trend details ‐ sneak peek on what's new * Surveys ‐ have a voice within our community * Exclusive deals and discount codes * Quick and easy replacement part service To register your product, visit ameriwoodhome.
Español Cubierta Delantera Este libro de instrucciones contiene información IMPORTANTE de seguridad. Por favor lea y manténgalo para referencia en el futuro. No Regrese este producto! Comuniquese con nuestro amistoso equipo de servicio al cliente para obtener ayuda. Llamenos al: 1‐800‐489‐3351 (Gratis) Lunes ‐ Viernes 9am ‐ 5pm CST Visitar: www.ameriwoodhome.com PRECAUCION Este mueble puede volcarse y causar graves heridas y/o muerte. Anclar el mueble a un poste de madera en la pared (si esto se requiere).
Español Página 8 Tendrá que tocar el conector (3) con un martillo para insertarlo completamente. Asegúrese de que el conector esté colocado como se muestra antes de empujar en el orificio. Página 9 Rellene cada agujero de la clavija aproximadamente 1/3 con pegamento. Presione los pasadores en los agujeros como se muestra. Nota: Debería haber algo de pegamento al insertar las clavijas. Mantenga un paño húmedo a mano para limpiar esto mientras ensambla el gabinete.
Español Página 16 Rellene cada agujero de la clavija aproximadamente 1/3 con pegamento. Presione los pasadores en los agujeros como se muestra. Nota: Debería haber algo de pegamento al insertar las clavijas. Mantenga un paño húmedo a mano para limpiar esto mientras ensambla el gabinete. Tendrá que tocar el conector (3) con un martillo para insertarlo completamente. Asegúrese de que el conector esté colocado como se muestra antes de empujar en el orificio.
Español Página 29 Registre su producto para recibir lo siguiente: * Detalles de nuevas tendencias ‐ Vistazo a lo nuevo * Encuestas ‐ alec su voz entre su comunidad * Códigos de ofertas y descuentos exclusivos * Fácil y rápido servicio de partes de remplace Para registrar su producto, visite ameriwoodhome.
Français Couverture Avant CE LIVRET D'INSTRUCTION CONTIENT DES INFORMATIONS IMPORTANTES SUR LA SÉCURITÉ. VEUILLEZ LIRE ET GARDER POUR UNE RÉFÉRENCE FUTURE Ne retournez pas ce produit! Contactez notre équipe de service à la clientèle amicale d'abord pour obtenir de l'aide. Appelez‐nous: 1‐800‐489‐3351 (sans frais) du Lundi au Vendredi de 9h à 17h Heure Centrale Visitez: www.ameriwoodhome.com ATTENTION Le meuble peut basculer et causer des blessures graves ou la mort.
Français Page 8 Il est recommandé de taper sur le connecteur (3) avec un marteau pour l'insérer complètement. S'assurer que le connecteur soit positionné tel qu'indiqué avant de l'introduire dans le trou. Page 9 Remplissez chaque trou de cheville d'environ 1/3 avec de la colle. Enfoncez les chevilles dans les trous comme indiqué. Remarque: Il devrait y avoir un peu de colle à resserrer lorsque les chevilles sont insérées.
Français Page 16 Il est recommandé de taper sur le connecteur (3) avec un marteau pour l'insérer complètement. S'assurer que le connecteur soit positionné tel qu'indiqué avant de l'introduire dans le trou. Remplissez chaque trou de cheville d'environ 1/3 avec de la colle. Enfoncez les chevilles dans les trous comme indiqué. Remarque: Il devrait y avoir un peu de colle à resserrer lorsque les chevilles sont insérées. Gardez un chiffon humide à portée de main pour l'essuyer lorsque vous assemblez l'armoire.
Français Page 29 Enregistrez votre produit pour recevoir les éléments suivantes: * Détails sur les nouvelles tendances ‐ un aperçu sur les nouveautés * Sondages ‐ avoir une voix au sein de notre communauté * Offres exclusives et codes promo * Service de pièces de rechange rapide et facile Pour enregistrer votre produit, visitez ameriwoodhome.