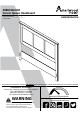
5555555COM CCCCCCCCCCCCCCCCCCCCCC BBBBBBBBBBBBB Date of Purchase: ____/____/_____ Lot Number: THIS INSTRUCTION BOOKLET CONTAINS IMPORTANT SAFETY INFORMATION. PLEASE READ AND KEEP FOR FUTURE REFERENCE. Do Not Return This Product! Contact our customer service team for help first Call: 1-800-489-3351 (toll free) Monday-Friday 9am - 5pm CST Visit: www.ameriwoodhome.com WARNING –Unit can tip over causing severe injury or death.
Contact Us! Do NOT return this product! Contact our friendly customer service team first for help Call us! 1-800-489-3351 Monday-Friday 9am - 5pm CST Assembly Tips Visit ameriwoodhome.
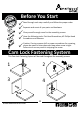
k Quic bly m Asse Ti p Before You Start P P P P P Read through each step carefully and follow the proper order Separate and count all your parts and hardware Give yourself enough room for the assembly process Have the following tools: Flat Head Screwdriver, #2 Phillips Head Screwdriver and Hammer Caution: If using a power drill or power screwdriver for screwing, please be aware to slow down and stop when screw is tight. Failure to do so may result in stripping the screw.
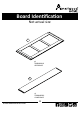
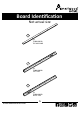
Board Identification Not actual size 1 x1 T5988196010 UPPER BASE 2 x1 T5988196020 LOWER BASE ameriwoodhome.
Board Identification Not actual size 3 x1 T5988196030 TOP MOLDING 4 x1 T5988196040 LEFT POST 5 x1 T5988196050 RIGHT POST ameriwoodhome.
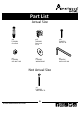
Part List Actual Size x13 TUD0001 Cam Bolt x13 TUD0002 Cam Lock 15-12 x14 TUD0022 CBS 4 x 30 x4 TUD0024 HEX NUT M6 x4 TUD0025 WASHER M6 x1 TUD0026 ALLEN KEY M4 Not Actual Size x4 TUD0023 JCBC M6 X 70 ameriwoodhome.
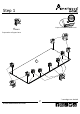
Step 1 Quick Assembly Tip x9 TUD0002 Preparation of upper base Proper orientation of CAM LOCK 1 ameriwoodhome.
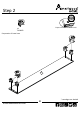
Step 2 Quick Assembly Tip Proper orientation of CAM LOCK x4 TUD0002 Preparation of lower base 2 ameriwoodhome.
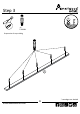
Step 3 x5 TUD0001 Preparation of top molding 3 ameriwoodhome.
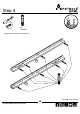
Step 4 x8 TUD0001 Preparation of left post & right post 5 4 ameriwoodhome.
Step 5 Attach upper & lower base to the right post 5 1 2 raw edge ameriwoodhome.
Step 6 Attach upper & lower base to the left post 4 1 raw edge ameriwoodhome.
Step 7 Attach top molding 3 raw edge ameriwoodhome.
Step 8 x14 TUD0022 Please secure the assembly by fully tighten the screws. ameriwoodhome.
Step 9 x4 TUD0023 x4 TUD0024 x4 TUD0025 x1 TUD0026 Use provided screw & nut to assemble the headboard with bed frame. Use spanar size 10mm (not provided) for better nut tightening. Bed frame shown is for artist impression only, actual might be vary depending on design. Headboard Bed frame ameriwoodhome.
Certificate of conformity Certificate of Conformity 1. This certificate applies to Dorel Home Furnishings, Inc. product identified by this instruction manual. 2. This certificate applies to compliance of this product with the CPSC Ban on Lead-Containing Paint ( 16 CFR 1303). 3. This product is distributed by: Dorel Home Furnishings, Inc. 410 East First Street South, Wright City, MO 63390 636-745-3351 4. Site of Manufacturer: Muar, Malaysia. 5. See front page of instruction manual for date of manufacturer.
RCgistCC yCCC pCCCCct tC CCcCiCC thC fCllCwiCg: * NCw tCCCC CCtCils -sCCCk pCCk CC whCt's CCw * SCCCCys -hCCC C CCicC withiC CCC cCmmCCity * ExclCsiCC CCCls CCC CiscCCCt cCCCs * CCick CCC CCsy CCplCcCmCCt pCCt sCCCicC To TCregister CCgistCCyour yCCCproduct, pCCCCct,visit CisitAmeriwoodhome.
Español Cubierta Delantera Este libro de instrucciones contiene información IMPORTANTE de seguridad. Por favor lea y manténgalo para referencia en el futuro. No Regrese este producto! Comuniquese con nuestro amistoso equipo de servicio al cliente para obtener ayuda. Llamenos al: 1‐800‐489‐3351 (Gratis) Lunes ‐ Viernes 9am ‐ 5pm CST Visitar: www.ameriwoodhome.com PRECAUCION Este mueble puede volcarse y causar graves heridas y/o muerte. Anclar el mueble a un poste de madera en la pared (si esto se requiere).
Español PÁGINA 7 Preparación de la base superior PÁGINA 8 Preparación de la base inferior PÁGINA 9 Preparación del moldeo superior PÁGINA 10 Preparación del poste izquierdo y del poste derecho PÁGINA 11 Sujete la base superior e inferior al poste derecho PÁGINA 12 Sujete la base superior e inferior al poste izquierdo PÁGINA 13 Sujete el moldeo superior PÁGINA 14 Asegure el conjunto apretando completamente los tornillos.
Español Página 17 Registre su producto para recibir lo siguiente: * Nuevos detalles sobre las tendencias - Sneek echa un vistazo a lo nuevo * Encuestas - tener una voz dentro de nuestra comunidad * Ofertas exclusivas y códigos de descuento Servicio de piezas de repuesto rápido y fácil Para registrar su producto, visite Ameriwoodhome.
Français capot avant Ce livret d’instructions contient d’importantes informations de sécurité. S’il vous plaît lire et conserver pour référence ultérieure. Ne pas retourner ce produit! Contactez notre équipe de service à la clientèle amical pour aider. Appel: 1-800-489-3351 (gratuit) Lundi - Vendredi 9am - 5pm CST Visite: www.ameriwoodhome.com MISE EN GARDE Ce mobilier peut basculer et causer des blessures graves et / ou la mort. Ancrer les meubles à un poteau en bois sur le mur (si cela est nécessaire).
Français PAGE 7 Préparation de la base supérieure PAGE 8 Préparation de base inférieure PAGE 9 Préparation du moulage supérieur PAGE 10 Préparation du post de gauche et du poste de droite PAGE 11 Attachez la base supérieure et inférieure au poste droit PAGE 12 Fixez la base supérieure et inférieure au poste gauche PAGE 13 Fixez le moulage supérieur PAGE 14 Veuillez fixer l’assemblage en serrant complètement les vis.
Français Page 17 Enregistrez votre produit pour recevoir les éléments suivants: * De nouveaux détails sur les tendances - Sneek vérifier la nouvelle * Sondages - ont une voix dans notre communauté * Offres exclusives et des codes de réduction Service de pièces de rechange rapide et facile Pour enregistrer votre produit, visitez Ameriwoodhome.