
Instructions / Assembly


29
ameriwoodhome.com
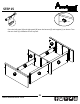
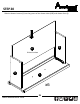
STEP23
For Masonry, Concrete, or other
wall materials:
Consult your local hardware store
for appropriate anchors to securely
attach the safety bracket.
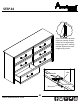
IMPORTANT:THISUNITMUSTBESECURETOTHEWALLTOHELPPREVENTTIPOVER.FOLLOW
THESEINSTRUCTIONSTOINSTALLTHEANTI‐TIPPINGSAFETYBRACKETPROVIDEDWITHTHIS
PRODUCT.
(x1)
#A84050
WARNING
Seriousorfatalcrushinginjuriescan
occurfromfurnituretipover.
Topreventtipover:
*Installtipoverrestraintprovided
*Placeheaviestitemsinthelowest
drawers
*Unlessspecifically designedto
accommodate,donotsetTVsor
otherheavyobjectsonthetopofthis
product
*Neverallowchildrentoclimb
or
hangondrawers,door,orshelves
*Neveropenmorethanone
draweratatime
Useoftipoverrestraintsmayonly
reduce,butnoteliminatetherisk
oftipover
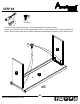
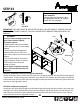
OPTION1:Attachmentintoawallstud(preferredmethod)
Usingastudfinder,locateastudinthe wall.Placeyourunitagainstthewall,withthesafetybracketaligned
inthislocation.Tomakedrivingthescreweasier,youcandrilla1/8"diameterpilothole(3mm)throughthe
safetybracketintothestud.Drivethescre wthroughthe
safetybracketintothewallstud.Tightenthescrew
thatwasnotfullytighenedinstep6.
OPTION2:Attachmentintodrywall
Locateyour unitwheredesiredagainstawallandmarkthewallthroughthesafetybracket,thenmoveyour
unitaside.Drilla3/16"diameterhole(5mm)intothewallboard.Tapthewallanchorintotheholeuntilitis
flush.Moveyourunitintolocationandfastenthewallbracket
tothewallanchorwiththescre w.Tighten
thescrewthatwasnotfullytightenedinstep6.
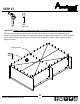
14c
14d
stud
wallboard
hole
14c
14d