LTR50001143, Rev.
Table of Contents Important Safety Instructions . . . . . . . . 1 Cleaning and Maintenance . . . . . . . . . . 32 Preparing for Your New Portable Spa . . 3 Removing and Reseating the Pillows . . . . 32 Pre-Delivery Checklist . . . . . . . . . . . . . . . . . 3 Planning the Best Location . . . . . . . . . . . . . 3 Spa Cover . . . . . . . . . . . . . . . . . . . . . . . . . . 32 Draining Your Portable Spa . . . . . . . . . . . . 33 Preparing a Good Foundation . . . . . . . . . . .
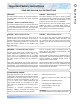
Important Safety Instructions WARNING: DANGER -- Risk of injury: To reduce the risk of injury, do not permit children to use this product unless they are closely supervised at all times. The suction fittings in this spa are sized to match the specific water flow created by the pump. Should the need arise to replace the suction fittings, or the pump, be sure the flow rates are compatible.
Read This First! 2 DANGER -- Risk of electric shock: • Replace a damaged power cord immediately. • Do not bury the power cord. • Connect to a grounded, grounding-type receptacle only. WARNING: People with infectious diseases should not use a spa or hot tub. WARNING: To avoid injury, exercise care when entering or exiting the spa or hot tub. WARNING: Do not use drugs or alcohol before or during the use of a spa or hot tub to avoid unconsciousness and possible drowning.
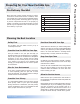
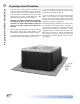
Preparing for Your New Portable Spa Most cities and counties require permits for exterior construction and electrical circuits. In addition, some communities have codes requiring residential barriers such as fencing and/or self-closing gates on property to prevent unsupervised access to the property by children. Your dealer can provide information on which permits may be required and how to obtain them prior to the delivery of your spa.
Preparing for Your New Portable Spa 4 Preparing a Good Foundation Your spa needs a solid and level foundation. The area that it sits on must be able to support the weight of the spa, with water and the occupants who use it. If the foundation is inadequate, it may shift or settle after the spa is in place, causing stress that could DAMAGE YOUR SPA SHELL AND FINISH. Damage caused by inadequate or improper foundation support is not covered by the warranty.
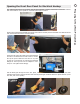
Opening the Front Door Panel for Electrical Hookup Reach in and pull the drain assembly through by a few inches. Carefully unscrew the black outer drain knob and then unscrew and remove the front door panel. Pictured to the right is the inside of the spa behind the front door. The electrician now has access to connect the spa for power.
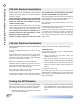
Preparing for Your New Portable Spa 6 240 Volt Electrical Installation All 240V spas must be permanently connected (hard wired) to the power supply. See the wiring diagrams starting on page 8. These instructions describe the only acceptable electrical wiring procedure. Spas wired in any other way will void your warranty and may result in serious injury.
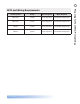
7 Control System Pumps GFCI Required NEO 1500 1 Pump One 40 amp GFCI Four #8 AWG copper wires NEO 1500 2 Pump One 50 amp GFCI Four #6 AWG copper wires VS300 1 Pump One 40 amp GFCI Four #8 AWG copper wires VS5100 2 Pump One 50 amp GFCI Four #6 AWG copper wires American Spa Owner’s Manual LTR50001143, Rev.
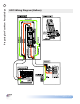
Preparing for Your New Portable Spa 8 GFCI Wiring Diagram (Balboa) American Spa Owner’s Manual LTR50001143, Rev.
9 American Spa Owner’s Manual LTR50001143, Rev.
Preparing for Your New Portable Spa 10 NEO Wiring Diagram American Spa Owner’s Manual LTR50001143, Rev.
11 1. Inspect the spa equipment. After the spa has been placed on an approved surface and has been correctly wired by a licensed electrician, inspect all plumbing connections in the equipment area of your spa. Ensure that these connections are secure and that they did not loosen during shipment. If your spa has gate valves, make sure they are all in the UP or OPEN position. IMPORTANT NOTE: Depending on the year and model, your particular spa may not be equipped with gate valves.
12 Preparing for Your New Portable Spa 4. Turn on power to the spa. When the spa is filled to the correct level, turn on the power at the GFCI breaker. (Ensure that the 120V spas are connected to the proper electrical outlet.) 5. Prime the pump. For NEO 1100. Press the RETURN button on the control panel. After two minutes, the pump should prime. If it does not, follow the priming instructions on the next page. If it does, continue with the next step. For VS300.
13 Make sure the filter has soaked at least 30 minutes before you install it. Insert the filter all the way and screw it in. Do not over-torque the cartridge during installation, just hand tighten gently. 7. Adjust water chemistry. Test and adjust the water chemistry. See the section on page 26 for instructions on water clarity. 8. Let the spa heat up. When the spa has finished priming, the heater will activate. Put the cover on and let the spa heat to the set temperature.
Preparing for Your New Portable Spa 14 Priming the Pump New spa owners often have difficulty the first time they start their spa and the pump fails to prime. This can be frustrating, but these simple instructions can help you. Sometimes air can become trapped in the pump while filling the spa. You will know this has happened when after you have filled and started the spa, the pump does not seem to function. You will hear the pump operating, but no water will be moving.
Operating Your Spa 15 Operating Your Spa Spa Topside Control (Balboa) For one pump systems For two pump systems Initial Start-up When first powered up, your hot tub will perform a self-diagnostic check and go into priming mode. When the control panel displays PR, IMMEDIATELY do the following: 1. Press the JETS 1 button to turn on the pump and let it run for 10 seconds. The pump should be running in low speed. 2. Press the JETS 1 button again and let the pump run in high speed for 10 seconds. 3.
Operating Your Spa 16 Standard, Economy and Sleep Heating Modes Your new hot tub is equipped with a heating feature that gives you complete control of the heating system. When the hot tub is powered up, it will automatically start in standard heating mode. • St will light briefly on the main display. In this mode, the heating system will automatically maintain the set temperature. In the economyheating mode, the heating system will only activate during filtration times.
17 Your new spa comes equipped with an electric heater. Following the directions listed below will ensure the most efficient operation: NOTE: This method is only for spa usage under two hours a week. • Keep the spa’s operating temperature 5˚F below the desired usage temperature when not in use. One or two hours before use, set the temperature to the desired temperature. • If the spa usage exceeds two hours a week, the set temperature should remain at the desired usage temperature.
Operating Your Spa 18 Message Meaning Action Required LF Persistent low flow problems. Heater is shut down, but other spa functions continue to run normally. Displays on the fifth occurrence of the HL or HFL message within 24 hours. Follow action required for HL or HFL message. Heating capacity of the spa will not reset automatically. Press any button to reset. OH OHS Overheat protection. The spa has shut down. One of the sensors has detected that the spa water is 110°F. DO NOT ENTER THE WATER.
19 NEO one-pump system NEO two-pump system American Spa Owner’s Manual LTR50001143, Rev.
Operating Your Spa 20 American Spa Owner’s Manual LTR50001143, Rev.
21 F F F American Spa Owner’s Manual LTR50001143, Rev.
Operating Your Spa 22 Settings Screens American Spa Owner’s Manual LTR50001143, Rev.
23 American Spa Owner’s Manual LTR50001143, Rev.
Operating Your Spa 24 Jets Almost all of the jets in your spa are adjustable. Rotating the face of an adjustable jet to the left (counter-clockwise) will decrease the amount of water flow through the jet. Rotating the face of an adjustable jet to the right (clockwise) will increase the amount of water flow through the jet. (See example shown below.) Neck jets adjust in the opposite directions (counterclockwise to increase, clockwise to decrease).
25 Some spa series include a waterfall. When the booster pump is on, rotate the dial on top (for the cascade waterfall) or turn the knob (for the hydro streamer -see below). Hydro Streamer Waterfall Your spa may include two to eight streamer waterfalls. When the booster pump is on, turn the 1” diverter knob to adjust the rate of flow to the waterfall jets. The waterfall jet faces are not adjustable. Do not turn the jet faces because you may accidentally remove them.
Clear Water Plan Contents of this section: Testing and Adjusting Spa Water Sanitation Filtration Bather Load Starting the Spa with Fresh Water Maintenance Schedule Troubleshooting Water Clarity Problems This section is intended for new spa owners with no experience with water chemistry. Everyone’s experience with maintaining water quality is different, but there are some general concepts you need to know. Water maintenance is not difficult, although it requires regular attention.
27 You have two types of testing methods to choose from: • The reagent test kit is a method which provides a high level of accuracy. It is available in either liquid or tablet form. • Test strips are a convenient testing method commonly used by spa owners. Balancing the Total Alkalinity Balancing the Calcium Hardness Total alkalinity (TA) is the measure of the total levels of carbonates, bicarbonates, hydroxides, and other alkaline substances in the water. TA can be considered a “pH buffer”.
Clear Water Plan 28 Sanitation Sanitizers kill bacteria and other organic waste by breaking them down to non-harmful levels and are filtered out. Before you fill your spa, you need to decide which chemical sanitizer you wish to use. Consult your Cal Spas dealer for the right decision with regards to your lifestyle and spa usage. We recommend either bromine or chlorine as your sanitizer. Both work well when maintained regularly. DO NOT use trichlor.
29 “Bather Load” is the term used to describe the number of people using a spa, combined with the length of usage, and the frequency of usage. All these factors have a great effect on the spa water. The higher the bather load, the more chemicals need to be added and a longer filtration time will be needed.
Clear Water Plan 30 Maintenance Schedule Each time you refill the spa Follow the section “Filling and Powering Up Your Portable Spa” on page 11. Prior to each use Test the spa water using either test strips a reagent test kit. Adjust chemical levels as necessary. Once a week Test the spa water using either test strips a reagent test kit. Adjust chemical levels as necessary. If your water source is high in calcium, add stain and scale preventer. Once a month Deep clean your spa’s filter.
31 Problem Cloudy Water Probable Causes Possible Solutions • Dirty filter • Clean filter • Excessive oils / organic matter • Shock spa with sanitizer • Improper sanitization • Add sanitizer • Suspended particles / organic matter • Adjust pH and/or alkalinity to recommended range • Overused or old water • Run jet pump and clean filter • Drain and refill the spa • Excessive organics in water • Shock spa with sanitizer • Improper sanitization • Add sanitizer • Low pH • Adju
Cleaning and Maintenance 32 Cleaning and Maintenance Removing and Reseating the Pillows You can remove the pillows for cleaning and maintenance quickly and easily. This method works for all types of pillows. Grab the lower edge of the pillow with both hands firmly and pull up. As you do this, the pillow inserts will pop out of the holes. Reseat the pillows by aligning the pillow inserts with the holes and tapping the pillow hard enough to insert the pegs back into the holes.
33 1. Turn off the power at the breaker. 2. Remove all filters. 3. Using a Phillips screwdriver, remove the screws to the access panel and open it. 4. Locate hose ending with the ¾ inch hose-bib fixture. 5. Unscrew the cap. 6. Hook up the female end of a garden hose to the drain fitting. 7. Place the other end of the garden hose where you would like the water to drain to. 8. Turn the valve on the hose-bib fixture to open the drain. 9. Let spa drain completely, then remove garden hose. 10.
Cleaning and Maintenance 34 Vacation Care You can leave your spa unattended for up to two weeks if you follow these instructions. ALWAYS lock your cover using the cover locks if you plan to be away from home and the spa is filled with water. 1. Set the spa to VACATION Mode. (See instructions on page 22 for changing modes.) 2. Following the water quality instructions starting on page 26, adjust the pH. 3. Shock the water (add either chlorine or bromine sanitizer). 4.
35 Spa Cover and Pillows Due to the constant punishment your spa cover and pillows receive, you should protect them by applying a vinyl and leather cleaner as part of your monthly maintenance plan. Use a product that is specifically designed to protect spa covers and pillows from chemical and ultraviolet light damage without leaving an oily residue behind that is normally associated with common automotive vinyl protectants. Warning: Do not use automotive vinyl protectants on spa covers or pillows.
Sound System and Perimeter Lighting 36 Sound System and Perimeter Lighting Using the Freedom Sound System The Freedom Sound System™ entertainment option contains a Bluetooth-enabled speaker system that is available for certain Cal Spa models. Any Bluetooth-enabled device can be used to play audio through your spa. Before you can use the sound system, you need to pair the Bluetooth module with your device. The Bluetooth module is installed within the spa cabinet. Everything can be done with your device.
37 Press the LIGHT button on the topside control panel to turn the spa light on. If your spa has perimeter LED lights, they will also light up at the same time as the spa light. The LEDs operate in three modes: 1. Cycle: When you continually press the LIGHT button, the LEDs will cycle through the three main LED colors (Red, Green, and Blue) or combinations of the three that produce the following colors: light green, purple, light blue, yellow, etc.
Appendix 38 Appendix Please visit www.quickspaparts.com to order your replacement parts.
Please visit www.quickspaparts.com to order your replacement parts. Water Diverter Valves Hio, Roto, 3” pro-loc Diverter Valve 2” Star Fire, Textured Black PLU29530-121-500 PLU21300468 Diverter Valve 1” Star Fire, Textured Black PLU21300469 Hio, Roto, 3.5” pro-loc Air Control Valve PLU29530-031-500 Air Control Valve Star Fire Black PLU21300526 Euro Twist, 3” PLU29520-021-500 American Spa Owner’s Manual LTR50001143, Rev.
Appendix 40 Please visit www.quickspaparts.com to order your replacement parts. Waterfalls Replacement Cabinet Panels The complete selection of replacement cabinets for all models is very extensive and too lengthy for this owner’s manual. To order replacement panels for your spa, visit www.quickspaparts.com.
Please visit www.quickspaparts.com to order your replacement parts. All spa covers are designed with a tapered height, angling downward from the center to the sides to drive off rain and prevent water from pooling. Basic 4” - 2.5” 1.0 Lb. foam The covers listed below are filled with 1 lb. foam.
Appendix 42 Please visit www.quickspaparts.com to order your replacement parts. Spa Cover Lock and Key ACC01800020 Pillows Counter Lounge Pillow ACC01401500NL American Spa Owner’s Manual LTR50001143, Rev.
43 Symptom Possible Causes Possible Solutions System / Power Problems System does not work Power is turned off Reset spa Control pad and spa equipment do not operate No electrical power to spa Turn on or reset the GFCI circuit breaker. If this does not solve the problem, have a qualified electrician check the electrical service.
Appendix 44 Symptom Possible Causes Possible Solutions Water Problems Water is not clean For all water clarity problems, see page 26. High water consumption Very high evaporation or heavy splashing Use the cover and refill as necessary Low water stream from the jets Running in FILTER mode - slow speed Select high speed jets Block wall suctions or skimmer Clean the wall suction/skimmer.
45 Possible Causes Possible Solutions Pump Problems Pump runs constantly – will not shut off Problem with circuit board Contact your dealer Noisy pump Water level is too low Add water to normal level Block wall suctions or skimmer Clean the wall suction/skimmer Damaged or worn-out motor block Contact your dealer Clogged floor suction or skimmer Clean floor suction or skimmer Leakage of air into suction line Contact your dealer Debris is inside pump Contact your dealer Gate valves are clos
Limited Warranty This limited warranty is extended to the original purchaser of an American Spa™ manufactured after January 1, 2018 and installed for residential use. This limited warranty is only valid on portable spas delivered in the United States and Canada. 5 LIM WA R R A N T Y YEAR TR UC TUR S ITED 2 LIM ITED WA R R A N T Y 2 Years Shell Finish American Spas are warranted against blistering, cracking, or delaminating of the interior surface of the spa shell.
47 Warranty Limitations This Limited Warranty is void if: American Spas (the “Manufacturer”) or its designated representative determines that the spa has been subjected to alteration, neglect, misuse or abuse, or freight damage caused by the common carrier; any repairs have been attempted by anyone other than a designated representative; or if the failure is caused by accident, acts of God or other causes beyond the control of the Manufacturer.
Appendix 48 American Spa Owner’s Manual LTR50001143, Rev.
49 Appendix American Spa Owner’s Manual LTR50001143, Rev.
Locating the Product Serial Number The serial number of your spa is located on a metal plate attached to the lower right front panel of the spa. You will need this number to properly register your spa and activate coverage. Write this information in the space provided below.