
Installation Guide

Continued on next page
WALL TILE INSTALLATION INSTRUCTIONS PAGE 2 of 4
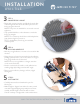
• Mix only enough adhesive or mortar to be use within 30
minutes.
• Using the type of trowel recommended on the adhesive
package, spread a 1/4 in. coat on the surface of one grid
area, using the flat side of the trowel.
NOTE: Do not cover guidelines or a larger area than
can be set in 15 minutes.
• Use the notched side of trowel to comb adhesive into
standing ridges by holding trowel at a 45° angle.
• Remove excess adhesive, leaving a uniform, ridged
setting bed.
• Begin with counter trim, then set full tiles from the first
row working back thus all cut tiles will be placed on the
back row against the wall.
NOTE: Trim pieces are available for use around recessed
appliances.
• Snap parallel chalk lines on the substrate as needed to
keep rows straight.
NOTE: Tile countertops should have a tile backsplash at
least 4 inches high for protection.
TIP: For backsplashes, match up joints with the
countertop tile.
4
3
• Carefully measure tiles and mark with a pencil or
felt-tip pen.
• Make straight or diagonal cuts with a tile cutter, curved
cuts with a nipper (chipping away small pieces for best
results), and full-length curved cuts with a rod saw.
Smooth out sharp-cut edges with a carborundum stone.
STEP 4:
APPLYING ADHESIVE
STEP 3:
COUNTERTOP LAYOUT
5
STEP 5:
CUTTING TILE
Continued on next page
INSTALLATION
WALL TILE