
User guide


13
3Operation
3.1 Operational Guidelines
This section describes the front panel display and kepad functions for the
Model 187. In addition to the front panel operation described, the remote
communication ports provide methods for performing the identical
operations and acquiring the current state of the instrument. Refer to the
Remote Interface section beginning on
page 27 for more details regarding
the communication functions.
3.1.1 Energizing the instrument
After completion of the
Installation
procedures, energize the instrument
by placing the power switch in the POWER (
) position. The LCD display
will briefly display the instrument name and ROM revision and all LEDs
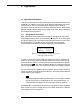
will be energized. The Model 187 will then begin level and usage
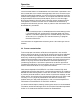
measurements and update the default display as illustrated below:
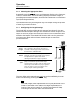
In order to access the various menus for setting the alarms, setpoints, fill
mode, etc. press a key while the default display is visible. Pressing a key
while the default display is visible activates the associated menu display,
e.g. pressing the
key while the default display is visible enters the HI
menu. Press the
key to exit a menu and return to the default display.
For more information regarding entering menus, exiting menus, entering
numerical values, and selecting menu options, refer to the Menu Reference
section beginning on
page 18.
Note
If the displayed level reading is below the LO alarm level or exceeds
the HI alarm level, an audible alarm will sound continuously. To
silence the alarms, see the MUTE menu description on page 22.
The Model 187 is calibrated at the factory for the specific sensor supplied
with the unit for use in a target liquid. If the USER calibration is desired,
see paragraph
3.3.11 on page 24.
Figure 3-1.
Default display showing level (in cm)
and usage (cm per minute).
/HYHO FP
∆PLQ ↑