
Specifications


SPEEDDOME ULTRA PRESSURIZED OUTDOOR DOME HOUSING 8200-0462-01, REV. B
INSTALLATION AND SERVICE GUIDE
5 of 10
Installing the Dome
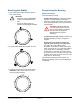
Connect the dome camera by aligning the
protrusion on the dome with the protrusion on the
mounting base (or white mark on the I/O board).
Then turn the dome clockwise to lock it.
Note: At this point, the dome should begin its
homing routine. During this routine, the camera
lens moves up into the housing, down to the floor,
pans slowly, and moves up to its home position.
The controller can then be used to call up and
control the dome.
Installing the
Desiccant Bag Bracket
Two desiccant bag brackets, each with two
desiccant bags, are installed in the housing to
absorb moisture after the purge process.
Before closing the bubble:
1. Remove a desiccant bag bracket from the
sealed plastic bag.
2. Pull the blower bracket away from the housing,
and slide the desiccant bag bracket behind it as
shown until the top of the bracket snaps behind
the lip in the blower bracket.
3. Repeat for the second desiccant bag bracket.
White mark
on I/O board
Turn dome
clockwise to
lock.
Brackets
installed.