
Installation guide


1
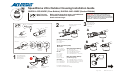
SpeedDome Ultra Outdoor Housing Installation Guide
RHODUL-03E/-03VRE (Clear Bubble), RHODUL-04E/-04VRE (Smoked Bubble)
2
= Step Prevents
Before performing these steps, read additional
information attached for important
details and warnings!
Water Intrusion.
Green Connector (Power)
Black Connector (Data)
Blue Connector (Alarm)
Gray Connector (Relay)
Manchester
(-02 Housing only*)
SensorNet
RS-422
3
A
A
C
B
B
Check o-ring is
properly set.
Turn until no threads
are exposed.
Keep cables from
twisting while turning
housing.
IMPORTANT!
This housin
g
meets IP66/Nema 4
ratin
g
s provided it is used with a properl
y
installed
ROENDC End Cap Assembly and one of the following
mounts: RHOTR Over-the Roof Mount, RHOSW Short
Wall Mount, or RHOLW Long Wall Mount.
Thread cables through
end cap assembly and
attach housing to
mounting structure.
Attach cable
connectors.
0100-2468-02 Standard Housing,
0101-0061-02 Vandal-Resistant Housing.
*
Blue alarm connector used with
-02 housings only.*
Pin 1 - 24Vac
Pin 2 - EMI Ground
Pin 3 - 24Vac
Pin 1 - White/Blue (Alarm 2, 3.5mA sink)
Pin 2 - White/Brown (
Pin 3 - White/Purple (
Pin 4 - White/Red (Alarm Return)
Alarm 3, 3.5mA sink)
Alarm 4, 3.5mA sink)
Pin 1 - Blue (Relay NC)
Pin 2 - Purple (Relay armature)
Pin 3 - Gray (Relay NO, 3.5mA sink)
Pin 4 - White/Red (Alarm Return)
Pin 5 - White/Black (Alarm 1, 3.5mA sink)
Pin 1-4 - Not used
Pin 5 - White/Orange
Pin 6 - White/Yellow
Pin 1-4 - Not used
Pin 5 - White/Orange
Pin 6 - White/Yellow
Pin 1 - Orange
Pin 2 - Green
Pin 3 - Yellow
Pin 4 - Brown
Pins 5-6 - Not used
Make connections,
insert cables into end
cap assembly, and
attach cover.
Ensure black foam plug is around
cable and press-fit into pipe.
At end of pipe.
See A, B, C.
A
B
C
Line up.
Push to line
and maintain
compresion.
Tighten
Ensure seal and sleeve are
properly set.
Seal
Sleeve
8200-0184-10, Rev. C
Page 1 of 12