Illustra Flex Series 3MP and 8MP Indoor and Outdoor Dome Cameras Quick Start Guide
Notice Please read this manual thoroughly and save it for future use before attempting to connect or operate this unit. The information in this manual was current when published. The manufacturer reserves the right to revise and improve its products. All specifications are therefore subject to change without notice. Copyright © 2020 Johnson Controls. All rights reserved. JOHNSON CONTROLS, TYCO and ILLUSTRA are trademarks and/or registered trademarks. Unauthorized use is strictly prohibited.
Table of Contents Illustra Flex Series 3MP and 8MP Indoor Dome Camera 1 Product features 1 Product overview 1 Installation 5 Illustra Flex Series 3MP and 8MP Outdoor Dome Camera 10 Product features 10 Product overview 10 Installation 14 System requirements 20 Network Connection 21 Default IP Address 21 DHCP 22 Managing cameras with the Illustra Connect tool 23 Network Topology 25 Appendix A: Technical Specifications 26 Appendix B: Stream Resolutions 30
Warning • These units operate at AC 24V/ PoE. • Installation and service should be performed only by qualified and experienced technicians and comply with all local codes and rules to maintain your warranty. • To reduce the risk of fire or electric shock, do not expose the product to rain or moisture. • Wipe the camera with a dry soft cloth. For tough stains, slightly apply with diluted neutral detergent and wipe with a dry soft cloth.
Illustra Flex 3MP and 8MP Indoor and Outdoor Dome Cameras Quick Start Guide Illustra Flex Series 3MP and 8MP Indoor Dome Camera This chapter provides product features, installation procedures, and connection information regarding the Illustra Flex Series Indoor Dome cameras. Product features Len cases require special care when handling and cleaning to avoid scratches. For information on bubble handling and cleaning, see 8200-1174-01 Bubble Clearing Procedure Application Note.
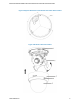
Illustra Flex 3MP and 8MP Indoor and Outdoor Dome Cameras Quick Start Guide Figure 3 Physical dimensions of the Illustra Flex Indoor Dome camera Figure 4 Pictorial index of the camera 8200-1456-02 K0 2
Illustra Flex 3MP and 8MP Indoor and Outdoor Dome Cameras Quick Start Guide Table 5 Pictorial index descriptions Index number Description 1 Camera bottom case 2 Tilt adjustment bracket 3 Loosen the screw to take off camera housing 4 Camera housing 5 Dome cover Figure 6 Pin definitions of the unit 3 8200-1456-02 K0
Illustra Flex 3MP and 8MP Indoor and Outdoor Dome Cameras Quick Start Guide Table 7 Interior button descriptions Interior button Description Resets to factory default by pressing and holding the button for five seconds. Reboots the unit. Analog out port. Power over Ethernet (PoE) port. Figure 8 Connectors of the camera NOTE Connectors and field wiring terminals for external Class 2 circuits provided with marking indicating minimum Class of wiring to be used.
Illustra Flex 3MP and 8MP Indoor and Outdoor Dome Cameras Quick Start Guide Figure 9 Audio and alarm pin definitions Installation In the box Check everything in the packing box matches to the order form and the packing slip.
Illustra Flex 3MP and 8MP Indoor and Outdoor Dome Cameras Quick Start Guide Checking appearance When first unboxing, check whether if there is any visible damage to the appearance of the unit and its accessories. The protective materials used for the packaging should be able to protect the unit from most types of accidents during transportation. Remove the protective part of the unit when every item is checked in accordance with the list in In the box on page 5.
Illustra Flex 3MP and 8MP Indoor and Outdoor Dome Cameras Quick Start Guide a 3 Connect the RJ-45 jack to a PoE compatible network device that supplied power through the Ethernet cable. Insert Audio cable and alarm cable to the unit, and connect the network cable to the RJ-45 terminal of a switch. Note:The power source needs to be NEC Class 2 or LPS.
Illustra Flex 3MP and 8MP Indoor and Outdoor Dome Cameras Quick Start Guide Limitation for three axes position: • Pan range: 375° CAUTION • Tilt range: 90° • Rotate range: Motorize Lens 356° Figure 11 Adjusting the position of the camera - End - Procedure 5 Locking the Camera Step Action 1 Use a soft, lint-free cloth to wipe the dome cover and remove fingerprints. 2 Attach the inner liner and camera housing. 3 Turn the power on after you have install the unit.
Illustra Flex 3MP and 8MP Indoor and Outdoor Dome Cameras Quick Start Guide Procedure 6 Installing the molded cap on the camera bottom case The molded cap is only applicable in installations that don’t need the gap for cables. Step Action 1 Install the molded cap (1) on the camera bottom case and ensure that it is securely attached.
Illustra Flex 3MP and 8MP Indoor and Outdoor Dome Cameras Quick Start Guide Illustra Flex Series 3MP and 8MP Outdoor Dome Camera This chapter provides product features, installation procedures, and connection information regarding the Illustra Flex Series Outdoor Dome cameras. Product features Len cases require special care when handling and cleaning to avoid scratches. For information on bubble handling and cleaning, see 8200-1174-01 Bubble Clearing Procedure Application Note.
Illustra Flex 3MP and 8MP Indoor and Outdoor Dome Cameras Quick Start Guide Figure 15 Physical dimensions of the Illustra Flex Outdoor Dome camera Figure 16 Pictorial index of the Illustra Flex Outdoor Dome camera 8200-1456-02 K0 11
Illustra Flex 3MP and 8MP Indoor and Outdoor Dome Cameras Quick Start Guide Table 17 Pictorial index descriptions Index number Description 1 Camera bottom case 2 IR board 3 Tilt adjustment bracket 4 Camera top case 5 Loosen the screw to take off camera housing 6 Dome cover Figure 18 Pin definitions of the unit 12 8200-1456-02 K0
Illustra Flex 3MP and 8MP Indoor and Outdoor Dome Cameras Quick Start Guide Table 19 Interior button descriptions Interior button Description Resets to factory default by pressing and holding the button for five seconds. Reboots the unit. Analog out port. Power over Ethernet (PoE) port. Note:The connector cable of the Outdoor Dome Camera should be contained in a conduit suitable for outdoor use.
Illustra Flex 3MP and 8MP Indoor and Outdoor Dome Cameras Quick Start Guide Figure 21 Audio and alarm pin definitions Installation In the box Check everything in the packing box matches to the order form and the packing slip. In addition to this guide, items below are included in the packing box.
Illustra Flex 3MP and 8MP Indoor and Outdoor Dome Cameras Quick Start Guide Checking appearance When first unboxing, check whether if there is any visible damage to the appearance of the unit and its accessories. The protective materials used for the packaging should be able to protect the unit from most types of accidents during transportation. Remove the protective part of the unit when every item is checked in accordance with the list in In the box on page 14.
Illustra Flex 3MP and 8MP Indoor and Outdoor Dome Cameras Quick Start Guide a Connect the RJ-45 jack to a PoE compatible network device that supplies power through the Ethernet cable. Note:The power source needs to be NEC Class 2 or LPS. The PoE connection should be provided by a UL Listed product and the connections shall be made in accordance with Article 800 of the NEC or local regulations.
Illustra Flex 3MP and 8MP Indoor and Outdoor Dome Cameras Quick Start Guide Figure 23 Mounting the camera with the junction box The mounting kit called out in Figure 23 on page 17 is not supplied with the unit. NOTE Keeping tilt angle over 25 degrees is recommended when IR-LED light is used. If tilt angel is below 25 degrees from the horizontal, the image would be flashed by the reflection of IR-LED light.
Illustra Flex 3MP and 8MP Indoor and Outdoor Dome Cameras Quick Start Guide Figure 24 Adjusting the position of the camera For outdoor Dome camera series: Users can adjust zoom level and focus level using the Illustra Connect Web User Interface. NOTE - End - Procedure 12 Locking the Camera Step Action 1 Use a soft, lint-free cloth to wipe the dome cover and remove fingerprints. 2 Attach the inner liner and camera housing. 3 Turn the power on after you have install the unit.
Illustra Flex 3MP and 8MP Indoor and Outdoor Dome Cameras Quick Start Guide Procedure 14 Installing the molded cap on the camera bottom case The molded cap is only applicable in installations that don’t need the gap for cables. Step Action 1 Install the molded cap (1) on the camera bottom case and ensure that it is securely attached.
Illustra Flex 3MP and 8MP Indoor and Outdoor Dome Cameras Quick Start Guide System requirements The below table lists the minimum requirements to implement and operate Illustra Flex Indoor and Outdoor Dome cameras. Table 27 System Requirements System hardware CPU Intel Pentium 4 2.
Illustra Flex 3MP and 8MP Indoor and Outdoor Dome Cameras Quick Start Guide Network Connection Default IP Address Since this is a network-based unit, an IP address must be assigned at the very first bootup. The default IP address of the unit is 192.168.1.168 and sub mask is 255.255.255.0. However, if you have a DHCP server in your network, the unit obtains an IP address automatically from the DHCP server so that you do not need to change the IP address of the camera.
Illustra Flex 3MP and 8MP Indoor and Outdoor Dome Cameras Quick Start Guide Procedure 15 Connecting from a computer Step Action 1 Ensure the camera and your computer are in the same subnet. 2 Check whether if the network is available between the unit and the computer by pinging the default IP address. 3 a Start a command prompt. b Type “Ping 192.168.1.168”. If the message “Reply from…” appears, it means the connection is available. Start Internet Explorer and enter IP address: 192.168.1.168.
Illustra Flex 3MP and 8MP Indoor and Outdoor Dome Cameras Quick Start Guide 5 a Enter the IPv4 Address in the IPv4 Address text box in the form xxx.xxx.xxx.xxx.The default setting is ‘192.168.1.168’ b Enter the Network Mask in the Network Mask text box xxx.xxx.xxx.xxx. The default setting is ‘255.255.255.0’ c Enter the Gateway IP address in Gateway text box xxx.xxx.xxx.xxx. d Enter the Primary DNS Server in the Primary DNS Server text box xxx.xxx.xxx.xxx. Select Apply to save the settings.
Illustra Flex 3MP and 8MP Indoor and Outdoor Dome Cameras Quick Start Guide Procedure 19 Connecting to the camera using the static IP address Step Action 1 The camera attempts to obtain an IP Address from the DHCP Server. When no DHCP Server is available the camera is assigned a Static IP address of 192.168.1.168. 2 Open Microsoft Internet Explorer and enter the URL of the camera as 192.168.1.168. The camera sign in page displays.
Illustra Flex 3MP and 8MP Indoor and Outdoor Dome Cameras Quick Start Guide Network Topology The Illustra Flex cameras deliver video images and audio in real-time using the Internet and Intranet. It is equipped with an Ethernet RJ-45 network interface. The following images illustrate the network topologies of the cameras.
Illustra Flex 3MP and 8MP Indoor and Outdoor Dome Cameras Quick Start Guide Appendix A: Technical Specifications The table below lists technical specifications of the Illustra Flex Indoor and Outdoor Dome camera. General Features Model Type Indoor Mini-dome camera Outdoor Mini-Dome camera Model No.
Illustra Flex 3MP and 8MP Indoor and Outdoor Dome Cameras Quick Start Guide Aperture Range F/1.4(W) ~ F/2.7(T) F/1.4(W) ~ F/2.7(T) Focal Length Range 2.8-12 mm 2.
Illustra Flex 3MP and 8MP Indoor and Outdoor Dome Cameras Quick Start Guide Rate Video Imaging Dynamic Range Method 3MP includes WDR, TrueWDR, TWRD3x 3MP includes WDR, TrueWDR, TWRD3x 8MP does not include TWDR3x 8MP does not include TWDR3x Audio Sampling Bits 16-BIT 16-BIT Input Type SE/Line/MIC SE/Line/MIC Input Impedance 20K/Attenuation = 0 dB 20K/Attenuation = 0 dB Maximum Input Level 2Vp-p 2Vp-p Input connector Terminal Block Terminal Block Output Type Impedance Hi impedance Hi im
Illustra Flex 3MP and 8MP Indoor and Outdoor Dome Cameras Quick Start Guide Networking Languages supported English (default), Arabic, Czech, Danish, German, Spanish, French, Hungarian, Italian, Korean, Japanese, Netherlands, Polish, Portuguese, Swedish, Turkish, Chinese Traditional, Chinese Simplified, Russian.
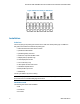
Illustra Flex 3MP and 8MP Indoor and Outdoor Dome Cameras Quick Start Guide Appendix B: Stream Resolutions Flex Gen 2 3MP and Flex 8MP Streaming Combinations Table 31 on page 30 and Table 32 on page 31 provide information for the stream resolutions and supported FPS of the Flex Gen 2 3MP cameras herein. Table 33 on page 32 provides information for the stream resolutions and supported FPS of the Flex 8MP cameras.
Illustra Flex 3MP and 8MP Indoor and Outdoor Dome Cameras Quick Start Guide Table 32 Flex 3MP Stream Set B (all resolution, codes and frame rate combinations of Stream 1, 2 and 3 are valid) Frame Stream Codecs Resolution Stream Rates (fps) Stream 1 Codecs Resolution 1664x936 1280x720 Stream Resolution H265/H26 IntelliZip (fps) TWDR Support H264/H264 IntelliZip 31-60 1280x720 H265/H26 IntelliZip MJPEG H264/H264 IntelliZip H264/H264 IntelliZip 31-60 1024x576 H265/H26 IntelliZip MJPEG MJPE
Illustra Flex 3MP and 8MP Indoor and Outdoor Dome Cameras Quick Start Guide Table 33 Flex 8MP Indoor and Outdoor Dome Camera resolutions Flex 8MP Indoor and Outdoor Dome camera resolutions Stream 1 FPS Stream 2 (3840x2160) 4K 16:9 (1280x720) 720p (3264x1840) 16:9 (1024x576) PAL+ 16:9 1-15 (2592x1944) 4:3 (640x360) nHD 16:9 (2688x1520) 16:9 (480x360) 480 4:3 (2048x1536) QXGA 4:3 (384x288) 4:3 FPS Stream 3 FPS (640x360) nHD 16:9 (480x360) 480 4:3 1-15 or 130 7-15 (384x288) 4:3 (1920x1080)