
Installation guide

SS3GR1028F Series Installation Guide Chapter 2 Hardware Installation
The connection procedure is shown below:
1. Find the console cable provided in the accessory kit. Attach the Mini-USB end to
console port of the switch.
2. Connect the other side of the console cable to a character terminal (PC).
3. Power on the switch and the character terminal. Configure the switch through the
character terminal.
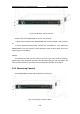
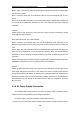
2.3.3 SFP Transceiver Installation
SS3GR1028F provide multiple 1000Mb SFP transceiver slots.
The procedure for installing SFP transceiver is shown below:
Step 1: Put on a ESD wrist strap (or antistatic gloves).
Step 2: Insert SFP transceiver to the guide rail inside the fiber interface line card. Do not
put the SFP transceiver up-side-down.
Step 3: Push SFP transceiver along the guide rail gently until you feel the transceiver snap
into place at the bottom of the line card.
Note: SFP transceiver supports the hot swap.
Caution!
Do not stare directly at the 2 fiber bores in the SFP transceiver when the switch is in
operation, otherwise the laser may hurt your eyes.
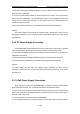
2.3.4 SS3GR10XFP Extended Module Installation
The SS3GR1028F series provide 10Gb slots. The procedure for installing the
SS3GR10XFP module and the XFP 10Gb fiber transceiver is shown below:
Step 1: Put on an ESD wrist strap (or antistatic gloves).
Step 2: Insert the SS3GR10XFP module to the guide rail inside the 10Gb module slot.
Step 3: Push the SS3GR10XFP module along the guide rail gently until it comes into
contact with the machine panel.
Step 4: Insert the XFP transceiver to the guide rail inside the SS3GR10XFP. Do not put
the XFP transceiver up-side-down.
Step 5: Push the XFP transceiver along the guide rail gently until it comes into contact with
the SS3GR10XFP.
Note: the XFP 10Gb fiber transceiver is hot swappable.
2-7