
Installation Guide


AmDry Installation Guide
Installation Steps:
Step 1:
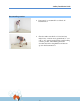
• The Amdry– Tile panels are installed by
overlapping the 1” open area of Tile board
around one side and one end of the panels
(without the expanded polystyrene (EPS)
insulation attached) onto the exposed expanded
polystyrene (EPS) foam insulation at the
opposite end and side of the panel. They are
secured to each other using construction
adhesive that is specifically designed for
“Foam Board”. (LePage PL300 is an
approved product for Foam board and is
available at most building material locations.)
• In the selected starting corner, place ½”
spacers at each side of the starting corner. At
this point you will need to cut the Tile backer
board on the side and end that has no eps foam
under it by 1” so that the tile backer board and
EPS foam are flush. Place the cut ends against
the ½” spacers and so that the end and side
with the exposed eps foam and backer board is
against the end and side wall inside the
spacers. You will need to continue to cut the
tile backer board at the side without the EPS to sit flush against the basement wall for
this entire row.
• the last panel of each row to fit the room size. Remember to include the ½” spacer at
the end of each row.
3