
Installation Guide
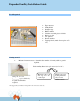

AmDry Installation Guide
3
Installation Steps:
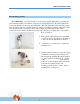
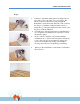
Step 1:
In the selected starting corner, place ½” spacers at
each side of the starting corner, lay the first Amdry
Panel. Cut an Amdry connector @ 22 1/2” for the
short end of the panel.
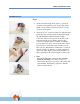
Place the 22 1/2” connector in the end of the first laid
panel, this can be inserted easily by hand and a light
tap with the rubber mallet will ensure a tight
connection. Place 2 more spacers at the side of the
wall and slide the second Amdry panel into the
connector of the first panel. Continue on with this
process until you come to the end of the wall. It may
be necessary to cut the last panel of each row to fit
the room size. Remember to include the ½” spacer at
the end of each row. Place the 4’ Amdry connectors
on the side of the Amdry panels along installed row.
This is generally in the longest direction of the room.
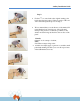
Note:
The Amdry LP plastic connectors have two flex
barbs on each wing , the connectors are to be
inserted into the pre-grooved edge of the Amdry LP
panel with the barbs facing upwards so that the
surface is flat and level