
User`s guide


Insyde -Confidential- Page
3 of 15
Overview
The following document is a user’s guide for Insyde’s XpressROM
TM
firmware for the AMD Geode
TM
processors
including the AMD Geode
TM
NX, LX, GX, SC1200, SC2200, SC3200, and GX1 processors. The user’s guide will
show you the menu systems for the firmware and a mechanism for flashing the BIOS on your platform. Insyde has
been working with AMD on the XpressROM
TM
firmware since 1999 and maintains a development relationship with
AMD. Insyde also supports the entire line of AMD products including AMD Alchemy
TM
, AMD Athlon
TM
, AMD
Opteron
TM
, AMD Turion
TM
, and AMD Sempron
TM
processors.
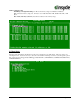
The User’s Guide is applicable to all the AMD Geode
TM
processor reference designs with the following part numbers
LX/CS5536 GX/CS5536 GX/CS5535
SC1200/SC1201,
SC2200,SC3200
SC1100 GX1
LX DB800
Geode GX
SBC RDK
GX DB533 SP4SC30 SP4SC40 SP2GX10
LX EPIC SP4GX22 SP4SC31 DBSC1100
LX ETX
Geode GX
Thin Client
SP2SC20
DBSC1200
Quick Start
1) Download the latest Evaluation Copy of XpressROM
TM
With a reference platform from AMD, the next step is to load the latest XpressROM
TM
for the platform. To find the
latest XpressROM
TM
for evaluation on the reference platform go to:
http://www.insydetech.com/productcenter/amd/geodesite/index.cfm
This website contains the latest released version of the XpressROM
TM
binary as well as a location to download boot
loaders for the reference platforms.
2) Flash latest version of XpressROM
TM
on AMD platform
Now that you have the latest evaluation copy of XpressROM
TM
, you must flash it onto your system by using either a
flash prom burner or using a flash utility supplied by Insyde Software.
If you do not have a copy of the flash utility, the website listed above contains a copy. Boot your system to DOS.
The command line to flash an xpress.rom image (256KB) of any size flash part (256/512/1024) is:
flashrom /D /sFFFC0000 xpress.rom
Where xpress.rom is the name of the binary you downloaded in step 1.
3) Clear CMOS
The next step is to boot your board and clear the CMOS. To clear the CMOS, boot the platform and enter the setup
by pressing F1 as the system is booting.
Select L. Load Defaults on the main menu
Next select X. Save Values and Exit.
4) Install OS and test system
The final step is to load the system with your operating system and test out the functionality.