
User Guide


How-To Install AMD Radeon™ Software on
a Windows® Based System
This article provides instructions on how to install AMD Radeon™ Software on a Windows®
based system. The content of this article is organized into the following sections:
o Downloading the AMD Radeon™ Software
o System Requirements
o Installing the AMD Radeon™ Software
Downloading the AMD Radeon™ Software
There are two options to locate and download the latest version of the AMD Radeon™ Software:
1. Use the AMD Driver AutoDetect Utility to detect your AMD Radeon™ graphics card and
Windows® operating system. If your graphics card and operating system is compatible with
AMD Radeon™ Software, the utility will provide the option to download it.
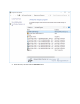
2. Visit the Drivers + Download Center page and select the version of AMD Radeon™ Software for
download. For instructions please refer to KB article: How to find the latest drivers for an AMD
graphics card.
System Requirements
For information about the system requirements refer to the AMD Radeon™ Software release
notes. Release notes are linked on the driver download page. System requirements may vary
depending on the Windows® operating system installed.
Note: AMD Radeon™ Software is only supported on Windows® 10, Windows 8.1, and
Windows 7.
Installing the AMD Radeon™ Software
1. Ensure that any existing versions of AMD Radeon™ Software on the system have been
uninstalled before proceeding with installing a new driver. For instructions on how to uninstall
AMD Radeon Software please refer to KB article: How-To Uninstall AMD Radeon™ Software
from a Windows® Based System.
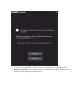
2. Close all opened applications including anti-virus, firewall, remote-access, or webcam software
before attempting the install process.
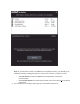
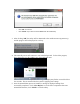
3. Double-click the downloaded file and select Install to begin file extraction process.
Note: It is recommended to use the default destination folder for installation.