
User's Manual Part 2

4
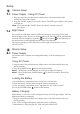
Volume Setting
2.4
Press volume up or down buttons to adjust volume level.
Press to increase volume.
Press to decrease volume.
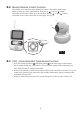
The system comes with a camera unit that has already been paired with the
monitor. The "Camera Paring" function gives each camera unit a separate
channel on the monitor unit. This is necessary for configuring additional
camera units.
If you want to add a new camera, please follow the below steps:
1. Make sure both the monitor unit and camera units are off.
2. Press and hold the “P” button on monitor unit and press button.
3. You will reach the below pairing screen:
4. Turn on the camera unit
5. Press pairing button on the camera unit, you will see the below screen when
pairing is successful.
6. Press button to start monitoring.
Brightness Setting (Brightness)
2.5
Press brightness up or down buttons to adjust the brightness.
Press to increase brightness.
Press to decrease brightness.
Press the “P” button on monitor unit to switch between different cameras.
The camera number (Cam #) will be shown on the top left corner of the screen.
Camera Paring
Camera Selection
3.1
3
Amcrest Camera Pairing System
Waiting signal from CAM1 ...
Press ‘PAIRING’ of Camera Unit to pair
Press ‘P‘ to skip and pair the next CAM ID
Press power button to abort and turn off
Amcrest Camera Pairing System
Waiting signal from CAM1 ...OK
Waiting signal from CAM2
Press ‘PAIRING’ of Camera Unit to pair
Press ‘P‘ to skip and pair the next CAM ID
Press power button to abort and turn off