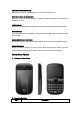
User Manual
Thank you very much for your choice of this product designed by our company! Contents For your safety ..................................................................................................................................2 About Your Phone.............................................................................................................................3 Preparing Your Phone .................................................................................................................
SWITCH OFF WHEN REFUELING Switch off the phone at a refueling point or any fuel or chemicals places. SWITCH OFF NEAR BLASTING POINT Don’t use the phone where blasting is in progress. Observe restrictions, and follow any regulations or rules. INTERFERENCE All wireless phones may be susceptible to interference, which could affect the performance. USE NORMALLY Use in the normal position explained in the product documentation. Don't touch the antenna unnecessarily.
Left Soft Key Enter the main menu at standby mode, as confirm key under other interfaces Right Soft Key Enter the phone book at standby mode, as back key under other interfaces. SIM1/2 Call / Answer (Green) key Press After dialing to connect, press if there is an incoming call to answer, press from standby to go to SIM1/2 call records list End/ Power Key Long press to power phone ON/OFF; press to end; reject call; or to exit a menu.
Preparing Your Phone 1. Installing SIM Card 1. Please keep your SIM card away from reach of children. 2. Scratches and bends can easily damage the SIM card. Please be extra careful when installing, removing, handling or storing your SIM card. 3. Before installing or removing the SIM card, make sure the phone is switched OFF, and then remove the back cover and battery. a. Slide the back covers upward the bottom of the phone until it can be removed. b. Remove the battery (see Removing Battery). c.
When USB cable plugged in, phone will have the following options: 1. Mass storage: the phone can be connected to the PC and used as a USB Flash Disk. 2. Webcam: the phone can be connected to the PC and used as a PC camera. 3. COM port: the phone can be connected to the PC and you can use web dial-up service. 7. Power on and off Press and hold Power key to turn on/off the phone. And if you have set PIN or phone code, input it correctly. 8. Security Code 1.
Make an extension call When making an extension call, input “P” that is a prefix of extension numbers. It will dial automatically in several seconds since you dialed the telephone exchange. viz.: area code—telephone exchange numbers—P—extension numbers, then press talk key. Make an international call “+” is needed when input country code. Input “+”, enter the country code, the area code and the phone number, press talk key to dial. Dial to Hong Kong, Macao and Taiwan phone ibid.
Input special character When use any kind of input method, press “sym” key to display the character list. Menu operation The phone provides an excellent menu. And you can select each submenu according to your need. Functions exist in these menus and submenus. Enter the menus by pressing left flexible key or center key. Function Menu 1. Messaging 1.1 Write message Access this menu to edit and send message, press “option” to do as following: 1.
Press ok key in viewing message screen to use functions such as resend, edit, delete, delete all and advanced. Please check Inbox for reference. 1.5 Sent messages Access this menu to view the saved messages.(save sent message function should be activated, see SMS settings > common setting) Press ok key in viewing message screen to use functions such as forward, delete, delete all and advanced. Please check Inbox for reference. 1.6 Delete messages 1. Inbox: Delete all messages from Inbox. 2.
please delete some unnecessary MMS. 1.8 Broadcast message Broadcast public information sent by the network providers. Use Cell Broadcast service, you can receive information on various subjects from network provider. For more available information, please contact your local network providers. 1. Receive mode: turn on/off broadcast message. 2. Read message: to read the broadcast message. 3. Languages: choose the language you want. 4. Channel settings: you can receive broadcast messages selectively. 1.
the holder. 13. Mark several: mark several calls 14. Caller groups: add the selected call to user’s group 15. Phonebook settings: 1.Preferred storage: select prefer storage SIM 1/SIM 2/Phone/All 2.Speed dial: Switch on/off the mode. Set the numbers from 2-9 3.My number: edit or send my number 4.Extra numbers: you can set owner numbers/fixed dial/SOS numbers 5.Memory status: show the total number and stored number of SIM and phone 6.
If it is supported by your service provider, this function will enable you to restrict the outgoing or incoming calls. You also can select the options: Cancel all, Change barring password. 5. Line switching Enter this menu user can switch to line1 or line2. 6. Closed user group To close user group. 3.2.2 Advance settings 1. Blacklist You can switch on/off this mode. When add a number in blacklist, you can not receive calls from this number. 2.
4. Delete: delete the selected file 5. Sort by: you can sort by name/type/time/size/none 4.2 Format: to format all the files in the memory card and systematically set up new file folders. Be cautious, all the data cannot be restored. 4.3 Remove: remove the memory card. 4.4 Rename: rename the memory card. 4.5 Details: to show the name of the memory card, total size and free size. 5.
8. Java The phone provides Java function and puzzle game for your entertainment. 8.1 Java: Display the installed Java application list, select one and enter “options” 1. Launch: Play the application. 2. Settings: You can adjust Network access/Auto invocation/Messaging/Multimedia/Read user data/Write user data/local connectivity. 3. Details: Display the detailed information of the application. 4. Restore default: To get back to default settings. 8.
Set Wallpaper, Screen Saver, Power On/Off Display, Show date and time. 6. Auto update of date and time Set the state to “on” or “off”. If the state is “on”, when connecting to swap network, the date and time will be update. 7. Misc. settings You can set the LCD backlight duration and brightness. 9.4 Network setup This feature is available to operate network settings when you are roaming or travel outside. Access the menu; you can select the network manually or automatically.
exchange etc while wirelessly connected with headphones, computer or any other handheld devices. 1.Power: Turn on/off this function. 2.Visibility: Active the Bluetooth been searched or not. 3.My Device: Display the current or once connected device, and inquiry the new one. 4.Search audio device: Search for the supported device (for example: Bluetooth headphone). 5. My name: Rename Bluetooth. 6. Advanced: 1. Audio Path: Select the path for Audio. 2. Storage: Phone or memory card. 3.
11.1.1 Set Region: Select the place where you are to get better signal. 11.1.2 Input channel: Input a number to turn to the channel directly. 11.1.3 Program List: It keeps all the channels that you can watch. 11.1.4 Scan: To auto scan the channels. 11.1.5 Full Screen: To get full screen for better watching. 11.2 Camera Select camera item in main menu to enter preview screen. Then press scroll right or left key to adjust the exposure value and scroll up or down key to zoom in or out.
2. Video settings: to adjust the video quality. 3. White balance: to select Auto/Daylight/Tungsten/Fluorescent/Cloudy/Incandescent 4. Effect settings: to select Normal/Grayscale/Sepia/Sepia green/Sepia blue/Color invert. 5. Storage: store the video into phone or memory card. 6. Restore default: to get back to the ex factory settings. After setting, touch center key to start or Suspend recording. And then, touch right soft key to stop and save.
3. 4. 5. 6. 7. Rename:Rename the selected file name. Delete:Delete the selected recording file. Delete all files:Delete all the recording files. Use as:use the recording as user profiles. Send:Send recording file to MMS or Bluetooth. 11.8 FM radio In the FM radio screen, you can touch the scroll left/right key to switch broadcast channels; press scroll up/down key to adjust the volume. 1. Channel list At most 30 channels could be saved in the list. 2.
MC: Cancel the memorized number. 12.4 Alarm When the mobile is off, if the battery has sufficient power, the alarm will continue working. You can set five alarms, you may turn on one or all of them as per request. Each alarm can be set individually. When the alarm time is up, the handset will give of tip sound. Press key stop then it can stop ringing. If, say, the time is up but handset is off, it will automatically turn on and ring. If pressing stop, the handset will enquiry you if you want to turn on.
This phone uses a rechargeable battery as power source, when the battery is weak, recharge immediately to protect the battery life. It is best to drain the battery first. When not using the charger, unplug it from the power source and the phone. Over charging will shorten the battery life. Not leave the charger connected to the unit or battery for more than one week. Temperature affects battery capacity. Your battery may need to be warm up or cool down before charging.
be able to give you any advice you may need in this area 2. Do not use your phone in damp areas. Technical Specifications NOTES: Actual operating conditions depend on the local network environment, SIM, and user behavior. Warning: Any consequence caused by misuse, abuse, or not following any or all of the above-written suggestions and instructions, the producer will not take any responsibility in any degree.
FCC RF Exposure Information and Statement The SAR limit of USA (FCC) is 1.6 W/kg averaged over one gram of tissue. Device types: U-360-2(FCC ID:ZU3UNNECTOSHELL ) has also been tested against this SAR limit. The highest SAR value reported under this standard during product certification for use at the ear is 0.473W/kg and when properly worn on the body is 0.388W/kg. This device was tested for typical body-worn operations with the back of the handset kept 1.5cm from the body.