Ambit Cable Modem U10C018 User’s Guide Rev. 1.
Contents 1. BEFORE YOU BEGIN ...................................................................................................... 4 Understand the Cable Modem’s Features .................................................................................................... 4 Contact Your Local Cable Operator ............................................................................................................ 4 Prepare Your Area for Cable Modem Installation .............................................
Web User Interface Home Page ................................................................................................................. 35 Cable Modem Information ........................................................................................................................ 36 Cable Modem Status .................................................................................................................................. 37 Downstream.......................................................
1. Before You Begin Your new cable modem provides high-speed access to the Internet by an active Internet Connection through your cable service provider. This user guide describes how to set up and use the cable modem. Before installing the cable modem, you should read this user guide to ensure proper cable modem operation.
Prepare Your Area for Cable Modem Installation Before installing your cable modem, you should first prepare your area. To do this: 1. Locate your cable outlet and ensure that it is located within proper distance of your cable modem and computer. Be sure not to bend the cable as this may strain the connector and cause damage. 2.
Be sure to follow the instructions provided for the port that you want to use. Using the USB port allows you to install the cable modem faster and easier than using the ethernet port, because you do not have to install and configure a network interface card (NIC). USB, however, only enables you to connect one computer to the cable modem. Using the ethernet port allows you connect multiple computers to a cable modem through the use of additional equipment that is not included.
3. Click Next. You will see the following Start Copying Files screen. 4. Click Next. You will see the following screen.
5. Click Finish. Now you can install the hardware. Insta lling the Hard ware This section explains how to connect the cable modem to the computer, wall outlet, and electrical outlet. To install the hardware: 1. Power off the computer 2. Connect one end of the coaxial cable to the cable modem’s cable connector. Connect the other end of the coaxial cable to the cable wall outlet. Be sure not to bend or over tighten the cables as this may strain the connector and cause damage.
Installing the Software Drivers This section explains how to install the software drivers that your PC requires for the cable modem to operate. Installing the Software Drivers in Windows 98 SE Operating System CAUTION: You must install the drivers located on the CD that ships with your cable modem. If you use the default Windows-supplied software drivers, you will not be able to properly install the cable modem. To install the cable modem software drivers using the Windows 98 operating system: 1.
3. Select Search for the best driver for your device (Recommended). Then select Next. You will see the following screen. 4. Check the CD-ROM drive check box and verify that the CD is in the CD-ROM drive. Click Next to have Windows search for the necessary driver files.
5. Select the updated driver (Recommended) Ambit USB Cable Modem Windows Driver and click next. You will see the following screen. CAUTION: You must verify that Ambit USB Cable Modem appears on the screen. If USB Composite Device appears, you must click Back twice and specify the correct location of the driver files. DO NOT proceed if USB Composite Device is displayed in the above window. Contact your cable provider for further assistance.
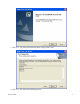
6. Click Next. The computer automatically installs the necessary driver files. You may see the following screen 7. If the above screen appears, you must insert the Windows 98 CD so that Windows can copy the remaining files.
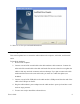
8. After files copying is done, you will see the following screen: 9. Click Finish to complete the installation. You will see the following screen.
10. Choose Yes to restart your computer. 11. After the computer is rebooted, verify that the USB LED is lit on the front of you cable modem. If not, refer to the troubleshooting section later in this chapter.
Installing the Software Drivers in Windows Me Operating System To install the cable modem software drivers using the Windows Me operating system: 1. Power on your PC. After your computer boots, Windows detects the cable modem. The Found New Hardware screen appears, followed by the Found New Hardware Wizard screen. 2. Insert the CD into the PC’s CD-ROM and click Next. You will see the following screen. 3. Select Automatic search for a better driver (Recommended) and click Next.
4. Click Next. The computer automatically installs the necessary driver files. 5. Click Finish after the computer has copied the necessary files. You will see the following screen.
6.
Installing the Software Drivers in Windows 2000 Operating System To install the cable modem software drivers using the Windows 2000 operating system: 1. Power on your PC. After your computer boots, Windows detects the cable modem. The Found New Hardware screen appears, followed by the Found New Hardware Wizard screen. 2. Insert the CD into the PC’s CD-ROM Drive and click Next. You will see the following screen.
3. Select Search for a suitable driver for my device (recommended. Then select Next. You will see the following screen 4. Check the CD-ROM drive check box and verify that the CD is in the CD-ROM drive.
Next to have Windows locate the necessary driver files. You will see the following screen. 5. Click Next to install the driver files for the cable modem. You will see the following screen.
7. Click Finish to complete the installation. 8. After the installation is completed, verify that the USB LED is lit on the front of you cable modem. If not, refer to the troubleshooting section later in this chapter.
Installing the Software Drivers in Windows XP Operating System 1. Power on your PC. After your computer boots, Windows detects the cable modem. The Found New Hardware screen appears, followed by the Found New Hardware Wizard screen. 2. Choose the software automatically (Recommended). Click Next to continue. You will see the following screen.
3. Click Finish to complete the installation.
Troubleshooting the USB Installation None of the LEDs is on when I power on the LAN Cable Modem. Check the connection between the power adapter and the cable modem. Power off the cable modem and wait for 5 seconds, and power on the modem again. If the problem still exists, you may have a hardware problem. When attempting to install the USB driver in Windows 98 SE, I receive the following error message: Device not installed at this time. Driver not found.
4. Select USB Composite Device and click Remove 5. Click Refresh The Add New Hardware Wizard window appears, displaying the device name USB Composite Device. Refer to the proper operating system instructions in this chapter for information on reinstalling the driver properly. All of the LEDs on the front of my modem look correct, but I cannot access the Internet. • If the power, usb, sync, and ready LEDs are solidly lit, the cable modem is working properly.
• Try restarting the computer so that it could re-establish a connection with the cable modem. • Power cycle the cable modem by removing the power adapter from the electrical outlet and plugging it back in. Wait for the cable modem to re-establish communications with your cable service provider. • • Remove any other USB devices from your computer and connect the cable modem’s USB cable directly to the USB port on your computer.
3. Installing the Modem Using the Ethernet Port This chapter explains the process for installing your cable modem using the ethernet port. Using the ethernet port allows to you connect multiple computers to the cable modem using additional equipment which is not included. Please contact your cable service provider for more information on using multiple computers. See Chapter 2 “Installing the Cable Modem Using the USB Port” for instructions on installing the cable modem using the USB port.
outlet or surge protector. 5. If the power, enet, sync, and ready LEDs are solidly lit, the cable modem is working properly. Troubleshooting the Ethernet Installation None of the LEDs are on when I power on the Cable Modem. Check the connection between the power adapter and the cable modem. Power off the cable modem and wait for 5 seconds, and power on the modem again. If the problem still exists, you may have a hardware problem. The enet LED on my cable modem is not lit.
modem. • If you are using a cable splitter, try removing the splitter and connect the cable modem directly to the cable wall outlet. Wait for the cable modem to re-establish communications with your cable service provider. • Your ethernet or coaxial cable may be damaged. Try using another cable. • If none of these suggestions work, contact your cable service provider for further assistance.
4. Cable Modem LEDs and Connectors This chapter describes the functions of the cable modem’s LEDs and connectors. When the power, sync, and ready LEDs are lit, the cable modem is working properly. The usb or enet LED should also be lit depending on what port is being used. The following provides an overview of the LEDs on the front of the cable modem and what the LEDs mean.
Installation problems with the cable modem are commonly due to the cable network and its topography. LEDs on the front panel of the cable modem reveal operational status and help you determine problem areas.
Connectors on the Back of the Modem This list of connectors describes where to connect the cables and power adapter when installing the cable modem. 1. power: This is where you plug the included power adapter. Remember to use only the power adapter that came with the cable modem. 2. enet: This is where you plug the included ethernet cable. The other end connects to the ethernet port on the PC or NIC. It is not requires when using the USB. 3. usb: This is where you plug the included USB cable.
3. Click LOGIN. Enter user for User name and user for Password, and then click OK.
4. If the user enters an incorrect user name and/or password, the web user interface displays “401 Unauthorized”. *** User Name:user & Password:user only can access to Firewall control, Parental control, and Diagnostics.
Web User Int erface Home Page A main menu is shown at the top of the pages and the user can select different options to view cable modem information.
Cable Modem Information User’s Guide 36
Cable Modem Status • Refresh Click “Refresh” to update result.
Down st rea m • Refresh Click “Refresh” to update result.
Up st rea m • Refresh Click “Refresh” to update result.
Up st rea m Bu rst • Refresh Click “Refresh” to update result.
Operation Pa ra meters User’s Guide 41
Ev en t Lo g • Clear Log Click “Clear Log” to empty event log.