
User Guide


AmbirScan User Guide
UG-AS-6.2 © 2019 Ambir Technology, Inc. Page 5 of 22
AmbirScan Overview
AmbirScan contains several adjustable settings which can be tailored to best suit your requirements. The
sections below explain each setting and their locations and functions within the program.
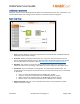
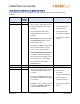
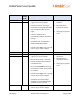
Scan Interface
1. Scan: This button allows for manual scanning if Auto Scan is turned off. Note: The side Menu bar will
display the current selection in orange.
2. Auto Scan: Default setting. When Auto Scan is on, any card or document inserted into the
scanner will automatically begin scanning. Note the button will appear gray with the II symbol.
For more information on Auto Scan, see the Auto Scan and Continuous Behaviors section.
3. File Name: This is where you enter the name you want for the item you’re scanning. The
default file name is Scan. To change, simply delete the name and type your desired file name.
4. Scan Profile: There are 4 default scanning profiles. The default active profile is Color. The
function buttons to the right of the profile name tell you which function key they are associated
to. See below:
• Color = F1 (scans all cards/documents in 300 DPI color, duplex.)
• Grayscale = F2 (scans all cards/documents in 300 DPI grayscale, duplex.)
• B&W = F3 (scans all cards/documents in 300 DPI black and white, duplex.)
• Business Cards = F4 (scans all cards/documents in 300 DPI color, simplex.)
5. Expand to Preview: After your scan is completed and saved, you may expand the preview
window to view your image.