
User Guide


AmbirScan User Guide
UG-AS-6.2 © 2019 Ambir Technology, Inc. Page 4 of 22
Welcome
Thank you for your purchase of an Ambir Technology scanner. AmbirScan is designed as a convenient
way to scan documents and manage your scanned files, including scanning business cards to Outlook,
and uploading and saving scans to cloud storage services. This User Guide is an easy-to-use reference for
all the features and functionality of the AmbirScan software.
Installing Your Scanner
IMPORTANT: Users must have full administrative rights to install the drivers and software. If you
are unsure of your user and/or installation privileges, please contact your local IT support. Ambir
Technology Support cannot change or edit your permission levels.
Before you can scan, you must install the appropriate driver. Please visit our Drivers page for easy
installation.
Installing AmbirScan
Our AmbirScan software is an easy to use application for users who are not using third party software to
integrate with their scanner.
Before installing the software, be sure that your scanner driver is installed. To install your driver,
please visit the Drivers page on www.ambir.com.
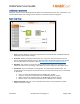
To install AmbirScan, follow the below steps:
1. Install AmbirScan software and follow the on screen installation prompts.
2. Upon final installation, the AmbirScan icon will be installed on your desktop.
3. Double-click the AmbirScan icon to open the software.
Before Scanning
The following models require calibration prior to scanning:
• PS667
• DS687
• PS600
• DS490
Calibration
All -AS model scanners require initial calibration. The -IX series scanners are factory calibrated, so initial
calibration is not required. For information on calibrating your scanner, please visit our FAQ page.
Cleaning
If you notice a deterioration in scanning quality over time, you may need to clean your scanner in
addition to calibration. For instructions on how to clean your scanner, please visit our FAQ page.