
User Guide


AmbirScan User Guide
UG-AS-6.2 © 2019 Ambir Technology, Inc. Page 21 of 22
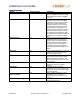
Advanced Settings Functions
Name
Default (On/Off)
Description
Search
On
Allows users to search for words in searchable
PDF, Word or Excel files saved in the Indexed
Folder locations specified. The default location
is C:\Users\Public\Documents\AmbirScan. This
folder may be changed by clicking the + button
and selecting a new folder for addition to the
list. As new folders are being indexed the
software will display an “Indexing” box in the
bottom right of the status bar with moving
circle as the files are scanned to be available for
future Search actions. To remove a folder from
indexing highlight the folder then click the –
button and then confirm the action to remove
the folder when prompted.
Use Tagging
On
Tagging allows for quick searching and
organization of saved media. For more
information on using tags, click here.
Use Keywords to Name Files
Off
Available when creating sPDF, Word, or Excel
files. If any of the keywords in this list are
included in the file, the keyword will be
included in the file name.
Clear Scans on Save
Off
When Continuous Scan mode is turned off in
the Settings tab, scanned images are
automatically cleared from the preview after
the image is manually saved.
Remember Cloud Services
Login
On
Remembers all cloud service credentials. Turn
off if you do not wish to have this information
saved.
Reset Cloud Credentials
NA
Removes any saved cloud credentials input.
Business Card Scanner
NA
Users who have not purchased an Ambir
scanner with AmbirScan Business Card will be
able to access 10 free trial scans with the
business card scanning functionality.
Otherwise, only users who purchased
AmbirScan Business Card should utilize the
Business Card Scanner Advanced Settings.
Create Outlook Contact
On
When users have selected Business Card
Profile F4, contacts will be automatically
created in AmbirScan and directly imported
into Outlook. See the AmbirScan Business Card
section for more information. To scan to a
specific private or shared folder in Outlook,
click on the three dots and select your desired
folder.
Export CSV File
On
Contacts are automatically exported to a CSV
file, either as a backup or to import into
another system like SalesForce. A single CSV file
is created in
C:\Users\Public\Documents\AmbirScan by
default or the folder selected as the save path
in the Settings tabs. Each time a card is
scanned, a new contact is added to the CSV file.