
User guide

112
Declaring the Node Shell
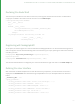
The next step is to declare the class and its constructor, ensuring that the base class constructor is called and an
output port is added to the node so we can connect it into the Node Graph.
class MyCustomImporter(Node3D):
def __init__(self):
try:
Node3D.__init__(self)
self.getParameters().parseXML(_Parameter_XML)
self.addOutputPort('out')
except:
log.exception("Error initializing %s node: %s"
% (self.__class__.__name__,
str(exception)))
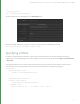
Registering with NodegraphAPI
At this point, we need to register our custom node with the Nodegraph API so it can be instantiated through the UI
and in the Python console. Add the following code to the bottom of your script, replacing the node name and node
class with your own.
NodegraphAPI.RegisterPythonNodeType('MyCustomImporter',
MyCustomImporter)
NodegraphAPI.AddNodeFlavor("MyCustomImporter", "3d")
The second line allows Katana to categorize your custom node within the right-click menu in the Node Graph tab.
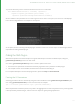
Defining the User Interface
With the shell of the Node complete we can now add the first key component, the user interface. The UI that is
displayed in the Parameters tab is described using a simple XML structure, an example of which can be found
below.
_Parameter_XML = """
<group_parameter>
<string_parameter name='name' value='/root/world/geo/...'/>
<string_parameter name='abcAsset' value=''/>
<number_parameter name='addForceExpand' value='1'/>
<string_parameter name='addBounds' value='children'/>
<number_parameter name='fps' value='24'/>
<number_parameter name='addToCameraList' value='0'/>
15 WRAPPING SGG PLUG-INS IN A CUSTOM NODE | DEFINING YOUR NODE CLASS