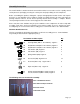
User’s Product Manual OM Edition 8 LifeSport LS-XT Air Bike
Introduction Congratulations on your purchase of the LS-XT Air Bike. This product has been designed and manufactured to meet the needs and requirements for domestic use. By choosing the LS-XT Air Bike, you have made a wise decision that will improve your health. Being fit and healthy will improve your energy level and your quality of life.
Table of Contents Introduction……………………………………………………………………………………............. 1 Purchaser’s Reference Information …………………………………………………………………. 1 Table of Contents……………………………………………………………………………………… 2 Safety Instructions and Warnings……………………………………………………………………. 3 Assembly Instructions ………………………………………………………………………………… 4 How to Adjust the Seat Height ……………………...………………………………………………. 7 Console Operation Instructions ……………………………………………………………………… 8 Warm Up & Cool Down ……………………………………………………………………………….
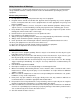
Safety Instructions & Warnings The LS-XT Air Bike is designed and manufactured to meet or exceed all domestic and international safety standards; however, certain precautions need to be followed when operating any exercise equipment. General safety instructions: 1. It is important to consult your physician before any exercise program. 2. Pregnant women should consult with their physician before beginning any exercise program.
Assembly Instructions The LS-XT Air Bike is made from the best materials and has been tested to receive a quality control review prior to its packaging; ensuring the correct parts and proper fitting of each component. Before assembling this product, distinguish a proper and appropriate location for the unit. Unpack the box in a clear workable area to allow for smooth assembly. Remove all of the parts from the packing material; however, do not discard packing material until assembly is complete.
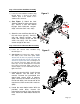
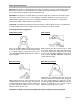
Step 1: Front & Rear Stabilizer Assembly Figure 1 1) Locate the front stabilizer hardware bag labeled Figure 1. Screw in the black stabilizer pads to the bottom of the stabilizer tubes #2 & #3. 2) (See Figure 1) Attach the front 30 stabilizer tube #(3) to the main frame #(1). Secure it with two M8x45 carriage bolts #(30), two washers #(59) and two acorn nuts #(67). 59 59 30 67 30 1 3) Attach the rear stabilizer tube #(2) to the main frame part #(1).
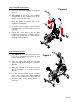
Step 3: Handlebars Assembly Figure 3 1) Locate the handlebar hardware bag labeled Figure 3. 2) (See Figure 3) Insert the left handlebar assembly #(6) to the handlebar post on the left side of the main frame #(1). 3) Place the pedal rod bracket #(8) to the handlebar assembly #(6). 6 66 65 66 67 67 4) Secure the two parts together with four button head bolts #(65), arc washer #(66), and acorn nuts #(67). 7 66 8 5) Repeat the same process for the right handlebar assembly #(7).
Step 5: Seat Assembly Figure 5 1) Locate the seat pad. 2) (See Figure 5) Pull out on the #55 pop pin to slide the seat post up. Loosen the preinstalled hardware on the seat pad. Attach the seat #(60) to the seat post #(4). Join them using the preinstalled three flat washers #(59), spring washers #(16) & M8 Nylon Nuts #(48). Use the 13mm wrench to tighten the hardware. Make sure that the seat pad is aligned straight before it is securely fastened.
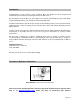
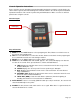
Console Operation Instructions Please read the console operation instruction thoroughly and practice using this console before you start in order to get a better understanding of the functions. Below is the console layout and detailed operation instructions. This console is powered by two AAA batteries. Make sure there is sufficient power before using this console.
Warm Up and Cool Down Warm-Up: The purpose of warming up is to prepare your body for exercise and to minimize injuries. Warm up 2-5 minutes is recommended before aerobic exercising. Warming up is the activity that raises your heart rate and warms up the working muscles. Cool-Down: The purpose of cooling down is to return the body to its normal or near normal resting state at the end of each exercise session. A proper cool-down slowly lowers your heart rate and allows blood to return to the heart.
Care and Maintenance The amount of maintenance required is very little and very simple; however, a failure to implement preventative maintenance suggestions can prevent the machine from operating as designed. The LS-XT Air Bike is only for indoor use and should not be stored in damp, extremely cold or hot areas as this will damage the unit voiding the warranty. Always inspect hardware prior to any exercise session. Look for loose hardware, loose pedals, loose cranks and frayed wires.
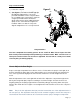
14 15 16 17 18 19 20 13 11 19 20 21 20 73 66 67 6 25 29 24 63 67 28 59 2 13 27 30 56 40 16 62 61 40 61 41 42 43 9 10 65 66 8 22 23 64 74 59 63 30 52 29 55 53 54 32 51 20 4 20 66 407677 5 44 34 32 49 53 54 32 5453 35 33 30 63 49 48 47 36 75 70 71 72 59 29 48 59 40 66 75 50 50 44 28 1 27 32 20 68 59 16 48 69 31 60 80 26 777679 20 37 13 25 24 37 46 45 63 61 37 8 66 7 23 22 9 43 10 38 54 65 20 18 4241 40 64 73 53 15 20 74 53 616216 4
Part List PART# PART NAME QTY 1 2 Main Frame Rear Stabilizer 1 1 3 4 Front Stabilizer Seat Post 1 1 5 6 Meter Post Left Handlebar 1 1 7 Right Handlebar 1 8 9 Pedal Rod Bracket Pendulum rod 2 2 10 11 Pedal rods Left Pedal 2 1 12 13 Crank Cap Screw, Round Head (M6 x 20mm) 2 4 14 Six angle bolt flange(M8 x35mm) 2 15 16 Screw, Round Head (ST4.0 x12mm) Spring Washers 7 5 17 18 Left Crank Turn table 1 2 19 Screw, Round Head(ST4.
PART # PART NAME 40 41 Bolt, Button Head (M8 x 1.25 x 20mm) QTY Large Flat Washer(M8) 8 2 42 Axle sleeveⅡ 2 43 44 Spacer Washer (Φ17 xΦ22 x 0.5mm) Screw, Round Head (M4 x 15mm) 2 4 45 46 Spring Washer (M6) Idler Arm 11 1 47 48 Idler Wheel Nylock Nut (M8x1.
Warranty Card Limited Consumer Warranty LS-XT AIR BIKE What is Covered. LifeCore Fitness, Inc.
property of LifeCore. LifeCore reserves the right to change manufacturers of any parts to cover any existing warranty. Any parts determined to be defective must be returned to LifeCore to obtain warranty service. You must prepay any shipping charges, export taxes, custom duties and taxes, or any other charges associated with transportation of the parts or Product. In addition, you are responsible for insuring any parts or Product shipped or returned. You assume the risk of loss during shipment.
Customer Service Toll Free (888) 815-5559 Mon-Friday 7:30 - 5:30 PT Service@lifecorefitness.com LifeCore Fitness Inc. 2575 Pioneer Ave. Suite 101 Vista, CA 92081 Visit our website for assembly videos: www.lifecorefitness.