
User guide


7
Getting started
Last updated 8/28/2014
• Select the Availability Zone of the server hosting the instance.
• Select an IAM role.
• You can optionally enable CloudWatch Monitoring. CloudWatch Monitoring may incur additional charges.
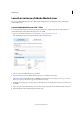
7 On the Advanced Instance Options screen, do the following:
• Select the default Kernel ID.
• Select the default RAM Disk ID.
• You can optionally copy a shell script to the User Data field. The shell script runs when the instance launches.
See Using Amazon Simple Storage Solution (S3) to store content.
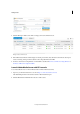
8 Click Next: Add Storage and select the location for the primary storage and the secondary storage. If necessary,
increase the size of the the primary and secondary storages.
Note: The secondary storage is mounted at the location /mnt.
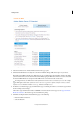
9 Adobe Media Server does not require that you add any tags. However, you may click Next: Tag Instance to add tags.
Use the value of the Name tag to identify the instance in the AWS Management Console, for example, you could set
the Name value to My First AMS Instance.
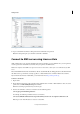
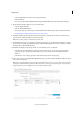
10 Click Next: Configure Security Group and do one of the following to choose a Key Pair:
• A Security Group is a firewall. If you’ve already created a security group, you can choose Select an existing
security group. Select a key pair from the list below. You can use one key pair for an unlimited number of
instances.
• Select Create a new security group. Enter a name and description for the security group.
11 Select connection type, for example SSH or HTTP, from the pop-up menu and click Add Rule to define how clients
can connect to the instance:
Note: If you’ve already defined a Security Group for Adobe Media Server instances, select it. You can use one Security
Group for an unlimited number of instances. When an instance is running, you cannot change the Security Group it
belongs to. However, you can modify the rules of a Security Group at any time.
Create a Security Group