Using ADOBE MEDIA SERVER on Amazon Web Services Marketplace ®
Legal notices Legal notices For legal notices, see http://help.adobe.com/en_US/legalnotices/index.html.
iii Contents Chapter 1: Getting started Create an account and get started . . . . . . . . . . . . . . . . . . . . . . . . . . . . . . . . . . . . . . . . . . . . . . . . . . . . . . . . . . . . . . . . . . . . . . . . . . . . . . . . . . . . . .1 Connect to AMS server using Windows . . . . . . . . . . . . . . . . . . . . . . . . . . . . . . . . . . . . . . . . . . . . . . . . . . . . . . . . . . . . . . . . . . . . . . . . . . . . . . . . . .2 Connect to AMS server using Linux or Unix . . . . . . . .
1 Chapter 1: Getting started Create an account and get started Adobe® Media Server (AMS) on Amazon Web Services is a pre-configured instance of Adobe Media Server Extended running on hardware in the Amazon Elastic Compute Cloud (EC2). Use Adobe Media Server on Amazon Web Services to stream live and on-demand media to Adobe® Flash® Player and Adobe® AIR®. Note: The latest AMS version available on AWS is AMS 5.0.5. To get started, complete the tasks in Create an account.
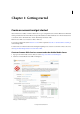
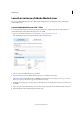
2 Getting started 3 To order Adobe Media Server for Amazon Web Services with your AWS account, go to www.adobe.com/go/learn_fms_aws_order_en. 4 Read the pricing terms and click Place your order. There is a $5.00 monthly subscription fee. This fee allows you to run an unlimited number of Adobe Media Server instances. In addition to the monthly subscription fee, there is a fee for hourly usage and a fee for data transfer. Note: Read the product license agreement at adobe.com/products/eulas/.
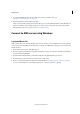
3 Getting started PuTTY login ❖ Log in as amsadmin user. Enter a valid password and confirm the new password. Note: For subsequent logins, you can either use PuTTY or WinSCP. Connect to AMS server using Linux or Unix AMS on AWS version 5.0.5 onwards, amsadmin is the new user and the root user is disabled. Also, you are required to reset the password for amsadmin user, the first time you login into the AMI instance. Note: Some companies block SSH access.
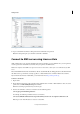
4 Getting started Launch an instance of Adobe Media Server You can now launch AMS either through 1-Click Launch utilizing Adobe’s recommended settings or through an Amazon EC2 console. Launch Adobe Media Server with 1-Click You can launch Adobe Media Server with preconfigured settings using 1-Click Lunch. If you use this method, an Amazon EC2 instance is launched in the background to host AMS. 1 Sign in to your Amazon Web Services account at https://console.aws.amazon.com/ec2.
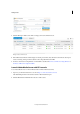
5 Getting started Launch status 7 Click the Manage in AWS Console link to manage your instance in EC2 Console. Manage instance in EC2 Console 8 Wait until the Status Checks column displays 2/2 checks passed. Then, select the instance and review its description, status, monitoring, and tags from the tabs below. Note the public DNS of the AMI. 9 Connect to this instance using Windows or Linux/Unix as described in Connect to AMS server using Windows or Connect to AMS server using Linux/Unix .
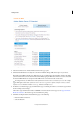
6 Getting started AMS Management Console 3 Select the desired version of Adobe Media Server from the pop-up list. 4 Click Launch with EC2 Console adjacent to the Amazon Machine Image (AMI) in the region of your choice. Optionally, select AMIs in the left pane of EC2 Console, choose Public images from the filter, and select the AMI you want to launch. You can also search for the desired AMI by typing the ID in the Search box to locate it.
7 Getting started • Select the Availability Zone of the server hosting the instance. • Select an IAM role. • You can optionally enable CloudWatch Monitoring. CloudWatch Monitoring may incur additional charges. 7 On the Advanced Instance Options screen, do the following: • Select the default Kernel ID. • Select the default RAM Disk ID. • You can optionally copy a shell script to the User Data field. The shell script runs when the instance launches.
8 Getting started Note: To stream media, you must open port 1935 for the RTMP protocol for TCP and UDP. You cannot add this rule in the Request Instances wizard. You will add it in the AWS Management Console. 12 Review the information for the instance. When you’re satisfied with the settings, click Launch. Your instances may take a few minutes to launch. Click View your instances on the Instances page to go to the AWS Management Console.
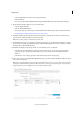
9 Getting started • Verify that TCP ports 1935 and 80 are open in the firewall of the computer running the web browser. Use the port test hosted by flashcomguru.com. If you see the line “RMTP Port 1935 Success”, you know that port 1935 is open. After you’ve verified that the server is running, complete the Tutorials: on-demand and live streaming . You can manage administrators and reset passwords by using the Administration Console.
10 Getting started WinSCP graphical user interface. Local files are in the left pane. Files on the Adobe Media Server instance are in the right pane. • (Linux) Open an SSH client installed on your computer and use the scp command to copy a file to the instance: scp -i keypair.pem sample.mp4 amsadmin@public-dns:/mnt/applications/vod/media For example, if the filename of the video is sample.mp4, the command is: scp -i amsdocs.pem sample.mp4 amsadmin@ec2-184-72-148-15.compute1.amazonaws.
11 Getting started 7 Open the StrobeMediaPlayback.html file in a browser and click Play. The file streams from Adobe Media Server on Amazon Web Services to the local version of Strobe Media Playback. 8 You can also serve Strobe Media Playback and its supporting files from the Apache web server installed with Adobe Media Server on Amazon Web Services. Copy the Strobe Media Playback files to the following directory: /mnt/webroot For example, create a folder /mnt/webroot/strobe.
12 Getting started Flash Media Live Encoder. 4 Download Strobe Media Playback from http://blogs.adobe.com/osmf/ and unzip it. 5 Open the file strobe_root_folder/10.1/StrobeMediaPlayback.html in a text or HTML editor. 6 Locate the following URL: "http://mediapm.edgesuite.net/strobe/content/test/AFaerysTale_sylviaApostol_640_500_short. flv" Replace the URL with the URL of the file you copied to the instance and save the file.
13 Getting started http://public-dns/strobe/StrobeMediaPlayback.html Live streaming with DVR To add DVR functionality to a live stream, do the following: 1 Download the DVRCast application from www.adobe.com/go/ams_toolsand unzip it. Note: The DVRCast application was developed for Adobe Media Server 5, but it supports Adobe Media Server on Amazon Web Services as well.
14 Getting started Adobe Media Server on Amazon Web Services includes an application called livepkgr that packages published streams for delivery using HTTP Dynamic Streaming. 1 Open Flash Media Live Encoder and enter the following: • In the Encoding Options panel, from the Preset pop-up menu, choose Multi Bitrate - 3 Streams (1500 Kbps) H.264. • Click the wrench next to Format to open Advanced Encoder Settings. For Keyframe frequency, select 4 seconds.
15 Getting started To package an on-demand file for HTTP Dynamic Streaming, use the File Packager tool. 1 Do the following to copy an FLV or F4V/MPEG-4 file from your local computer to the /webroot/vod directory on the Adobe Media Server instance: • Open an SSH client and issue the following command to copy a file to the instance: scp -i keypair.pem filename.xxx amsadmin@public-dns:/mnt/webroot/vod For example, the following command copies the file sample.f4v to an instance: scp -i amsdocs.pem sample.
16 Getting started Adobe Media Server includes a Multicast Configurator tool and a Multicast Player. To access these tools from a web browser, move them to the webroot directory on the instance. 1 Connect to the instance. Follow the steps in Connect to an instance and copy files from a Windows computeror Connect to an instance and copy files from a Linux/UNIX computer.
17 Getting started You can leave Make Unique unchecked. 7 Click Generate. The Multicast Configurator generates the following: • A name for the live stream. To publish a stream, you’ll click Copy and paste this value into the Flash Media Live Encoder Stream field. • An F4M file to use with the client multicast player. To view the F4M file, click View Manifest File. 8 Click Save Manifest File and do the following: a Save the manifest.f4m file to your local computer. b Connect to the instance.
18 Getting started Use Flash Media Live Encoder to capture and encode a live stream Play a multicast stream ❖ Open the following URL in a web browser: http://public-dns/multicast/multicastplayer/multicastplayer.html The Adobe Flash Player Settings manager displays a Peer Assisted Networking dialog. Click Allow to allow the peerto-peer connection.
19 Getting started Flash Player opens a Peer Assisted Networking dialog before the Multicast Player starts streaming The Multicast Player plays the stream that Flash Media Live Encoder is publishing.
20 Getting started Multicast Player Note: Multicast streaming requires Flash Player 10.1 and AIR 2. For more information about the multicast service, see Using the multicast servicein Adobe Media Server Developer’s Guide. In the examples, remember that on Adobe Media Server on Amazon Web Services, the installation directories are different than on other editions of the server. For information about installation directories, see Managing the server .
21 Chapter 2: Using Adobe Media Server on Amazon Web Services Supported features Supported Adobe Media Server features Adobe Media Server on Amazon Web Services is identical to Adobe Media Server Extended except that Adobe Media Server on Amazon Web Services limits the number of RTMFP introductions. For a list of Adobe Media Server Amazon Machine Images (AMIs) and a list of which version of Adobe Media Server Extended each AMI uses, see www.adobe.com/go/learn_fms_aws_en.
22 Using Adobe Media Server on Amazon Web Services For a complete list, see the Adobe Media Server Technical Overview Guide. Amazon Web Services features Adobe Media Server on Amazon Web Services supports all HTTP streaming features supported on Adobe Media Server including HLS and HDS.
23 Using Adobe Media Server on Amazon Web Services From the Amazon documentation: To allow access from other instances in a security group, enter the security group name in the Connection Source field.To configure this rule to apply to an IP address range, enter the CIDR range. For example, enter 0.0.0.0/0 to allow all IP addresses to access the specified port range. Enter an IP address or subnet to limit access to that one computer or network, for example 92.23.32.51/32.
24 Using Adobe Media Server on Amazon Web Services Connection method Protocol Port Description HTTP TCP 80 By default, Flash Player and AIR clients that cannot connect to Adobe Media Server over port 1935 attempt to tunnel over port 80 (RTMPT). If Apache is installed and enabled, HTTP requests made over port 80 are proxied to Apache over port 8134. All TCP 1935 By default, Flash Player and AIR clients make RTMP connections to Adobe Media Server over port 1935/TCP.
25 Using Adobe Media Server on Amazon Web Services Managing the server Remote management tools To manage your Amazon Web Services account, use any of the following: • AWS Management Console When you sign in to the console, select Amazon EC2 from the drop-down list. Or, after you sign in to the console, select the Amazon EC2 tab. After you sign in, you can launch an instance of Adobe Media Server. • Elasticfox, a Firefox browser extension that works much like the AWS Management Console.
26 Using Adobe Media Server on Amazon Web Services You will be prompted to enter a password. Ensure that the password is atleast 8 characters long. 3 Go to Users.xml and check for the salted hash of your password under the password tag. 4 Restart the server: ./amsmgr server ams restart 5 Open port 1111 in the Security Group of the instances you want to administer. Open the port only to the IP addresses that are allowed to access the Administration Server. See Modifying a Security Group.
27 Using Adobe Media Server on Amazon Web Services Connect to the Administration Console 1 Open a web browser and enter the following into the address bar: http://public-dns/ams_adminConsole.htm For example: http://ec2-184-72-164-117.compute-1.amazonaws.com/ams_adminConsole.htm The Administration Console is located on the instance in the following directory: /mnt/webroot/ams_adminConsole.htm 2 In the Server Address box, enter the Public DNS of the instance. 3 Enter the administrator username and password.
28 Using Adobe Media Server on Amazon Web Services ${USERS.HTTPCOMMAND_ALLOW} ping