
Installation Guide

TOOLS AND MATERIALS REQUIRED:
SAFETY PRECAUTIONS:
1. TURN OFF ELECTRICAL POWER BEFORE STARTING INSTALLATION OF LIGHT FIXTURE.
2. THIS PRODUCT MUST BE INSTALLED IN ACCORDANCE WITH THE APPLICABLE INSTALLATION CODE BY A
CERTIFIED ELECTRICIAN FAMILIAR WITH LOCAL MUNICIPAL CODES AND REQUIREMENTS.
3. CONSULT A QUALIFIED ELECTRICIAN TO ENSURE CORRECT BRANCH CIRCUIT CONDUCTOR.
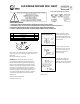
PART QTY
1.Prior to installation, install
A 1
mounting plate into the electrical
B 2
junction box with mounting screws.
C 3
Drive screws completely to the end
D 1
of the junction box.
on fixture with wire nuts. Connect
FLUSH MOUNT
white to white, black to black, and
ground wire to ground wire as
Radar sensor turns off the light after 17 seconds of no detection grounding connection.
and back on as the user re-enters the workplace from 4.5-5.5
yards away.
Back Convex Dimension: 2 1/8"x5/8"
3.Complete the installation by
WARNING: Wet-rated lighting fixtures are used in
pushing the fixture spring clips
places with direct exposure to water. These locations
towards the opening in the mounting
include almost all outdoor lights, including landscape
plate installed on the junction box.
lighting such as path lights and ground wells. Fixtures
rated for wet locations use waterproof seals to protect
their internal components from moisture. This does
not cover the section where the light is mounted to the
junction box. If water is entering through the juncton
box, it will enter the light fixture, and that is classified
as an electrical hazzard by most municipal and fire
departments.
Made in China
Customer service: 888-945-5221
Do not return to the store.
DESCRIPTION
LED disc light
Mounting screws
Wire nut
LED RADAR SENSOR DISC LIGHT
Mounting plate
2.Connect supply wires to wires
LED-
RSM55DL
LED-RSM7DL
A
B
C
D