
Instruction manual
4
· Do not lift the appliance by the front panel.
· Keep hot air outlet at least 1 meter away from ceiling.
CAUTION: In order to avoid a hazard due to inadvertent resetting of the thermal
cutout, this appliance must not be supplied through an external switching device, such
as a timer, or connected to a circuit that is regularly switched on and off by the utility.
Getting Started
· Remove the appliance from the box.
· Remove any packaging from the product.
· Place the packaging inside the box and either store or dispose of safely.
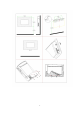
Contents of Carton
· Heater.
· Wall fixing bracket.
· Fixing screws and wall plugs.
· Remote control.
· 1 Instruction Manual.
Helpful Advice Before Fitting
· Please retain all packaging until you have checked and counted all the parts and the
contents of the fixing pack against the parts list.
· The fixing pack contains small items which should be kept away from young children.
· We suggest that you open the fixing pack and place all the contents into a container,
therefore reducing the risk of losing any small pieces.
Installation
· Do not connect the appliance until properly fixed to the wall and the instructions is read fully.
· The minimum distances must be observed.
· For installation of the appliance, care must be taken not to damage concealed cables.
· Please be careful while drilling the holes.
· This appliance is designed to be permanently fixed to a wall at a minimum height of
300mm.The wall bracket must be fitted horizontally and the cable routed to the bottom right
of the heater.
· A height of 600mm from bottom of heater to floor is recommended for optimum viewing of
fuel bed(see Fig.2 for recommend fixing dimensions).
· For optimum viewing, mark the top four screws fixing positions on wall in accordance with
the recommend fixing dimensions- see Fig.2.Drill holes with a six drill bit.
· Fix the wall bracket using that the plug and screws provided .
· Carefully lift the heater up ensuring that the top rear ledge of heater engages the wall bracket
(see Fig.2 in circle) and is sitting centrally.
· Gently bring the heater level with the wall.
· Mark the bottom holes position-see Fig.3, remove the heater ensuring that the bottom fixing