
Installation and Operation Guide

TS-3000i Web Clock Installation & Operation Guide 5-7
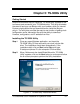
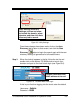
Step 2. From the main menu, click on View and select Advanced
options Report submenus.
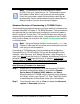
Step 3. From the Utility Report screen, select the desired file format
from the dropdown choices of HTML or text.
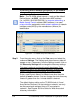
Step 4. Enter the desired Start/End dates and time for the transaction
report date range, or click on the box for “All time sync data”
and a report will be generated utilizing all the data from the
appropriate “ATVSTrans.txt” files.
Figure 5-8: TS-3000i Utility Report Tab
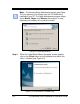
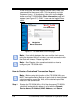
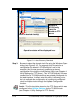
Step 5. Click on the Browse button to use the Windows Select
Directory dialog (see Figure 5-8) to navigate to the folder
where the “MAC address_ATVSTrans.txt” backup
files are to
use for the report.
Note – The “MAC address_ATVSTrans.txt” backup file for each
TS-3000i clock that is being used to create the transaction
report for the TS-3000i clocks can be found at the same FTP
location (directory path) where they were saved. You may want
to copy these files to another location/folder to create the
transaction report.
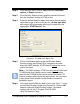
Step 6. You should see the files you want to use in the “Files *.*” listing
on the Select Directory screen (see Figure 5-9). Click the OK
button to close the Select Directory screen. The default
location path will be: C:\Program Files\TS-3000i
Utility\Transactions\Temp.