
Installation and Operation Guide

4-36 TS-3000i Web Clock Installation & Operation Guide
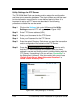
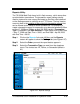
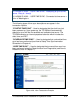
Step 4. Select the Date Selection for the transaction report data from
the dropdown menu. If Date Range is selected you must enter
the Start & End Date and Time for the range by using the drop
down menus. The date choices are; Today, Current Week,
Current Month, and Date Range (default = Today).
Step 5. Click on the
button to save the report settings.
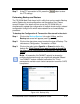
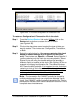
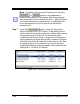
Step 6. Click on the View Transactions tab to view the transactions
based upon the previously defined and saved settings (see
Figure 4-28). All failed synchronizations will appear in red
when viewed in the browser. See the following for a
transaction view examples:
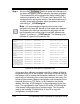
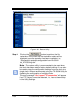
All manually forced time syncs will appear in orange in the
transaction report when viewed with the browser. See the
following example:
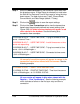
All sync retries will appear in blue when viewed with the
Reports – “View Transactions”. See the following example
which indicates a failure on the first sync retry and then a
connection.
01/08/2009 09:44:14 : - USER TIME SYNC - Trying to connect to time
server < Internal Time >
01/08/2009 09:45:17 : - USER TIME SYNC - Invalid time server or time
server not responding.
01/08/2009 09:45:17 : - USER TIME SYNC - Trying to connect to time
server < Univ. of Washington >
01/08/2009 09:45:17 : - USER TIME SYNC - Connected to time server
< Univ. of Washington >
01/12/2009 15:36:27 : - USER - Clock has been reset
01/12/2009 15:37:46 : - STARTUP TIME SYNC - Time from time server
< Univ. of Washington > is 01/12/2009 15:37:46