
Installation and Operation Guide


4-26 TS-3000i Web Clock Installation & Operation Guide
Important –
Care must be exercised when setting up Time
Sync schedules because a maximum of 8 separate Time Sync
schedules can be set up. Each of these 8 schedules could be
enabled and have up to a maximum of 12 scheduled time
syncs per day. The flash memory in the clock is capable of
retaining up to 5 years worth of data created as per OATS Rule
7430 which requires 2 Time Syncs per day. Therefore, if
multiple schedules are created and enabled, the length of time
that data could be retained might be severely reduced. This
should not discourage setting up multiple schedules. Perhaps
all of them do not have to be active. At any time, you can
simply activate or deactivate a schedule by clicking on the
enable box. However, you should be aware that the more time
syncs per day that the clock is scheduled to perform, the more
data that is going to be stored in the clock, thus filling up flash
memory faster.
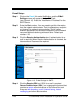
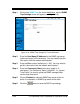
Step 3. Enter the schedule Name (maximum length is 20 characters).
Important – The acceptable characters for a Schedule name
are ‘a-z’ upper and lowercase, ‘0-9’, (-) dash, (_) underscore,
(*) asterisk, and a space. For example, “Before Trading” is a
valid format.
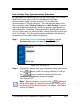
Step 4. Select Time Sync for the Type of schedule template from the
drop down menu. The choices for type are; Time Sync, Report,
and Backup.
Note
– A maximum of eight (8) time sync schedules, two (2)
Report schedules, and two (2) Backup schedules for a total of
12 separate schedules that can be user created. Report and
Backup schedules do not consume any of the on-board clock
flash memory.
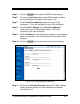
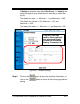
Step 5. Select the schedule start date from the drop down menus.
Step 6. Select the schedule start time from the drop down menus.
Step 7. Select the schedule recurrence. The choices are: Daily, or
Weekly.
If Daily is selected, then define Run Every “X” day(s), and
check Run Every: “X” min(s) to enter the number of minutes.