
Installation and Operation Guide


4-24 TS-3000i Web Clock Installation & Operation Guide
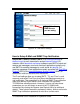
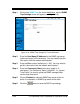
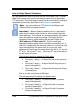
Step 1. Click on the SNMP Trap link under Notification
, and the SNMP
Trap Settings screen will appear (see Figure 4-19).
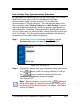
Figure 4-19: SNMP Trap Settings for E-mail Notification
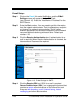
Step 2. Enter the Host Name/IP Address for the SNMP trap server
(maximum length is 50 characters). You may need to get this
information from the network administrator.
Step 3. Enter the Port number (default port = 162). You may need to
get this information from the network administrator.
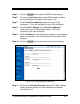
Step 4. Enter the Community Name (maximum length is 10
characters). The Community Name (“Identifier”, i.e., Amano
Time Clocks”) is used to group the SNMP managed Web
clocks under that name.
Step 5. Click on Enabled to make the SNMP trap server active for
alerts. If unchecked, no SNMP trap alerts will be used.
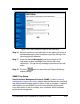
Step 6. Click the
button to save the SMTP trap settings.