
Installation and Operation Guide


TS-3000i Web Clock Installation & Operation Guide 4-21
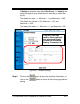
Step 5. Click the
button to save the SMTP e-mail settings.
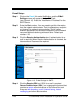
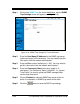
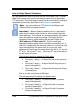
Step 6. Click on the Account(s) tab and the E-Mail screen to define
e-mail destinations will appear (see Figure 4-16).
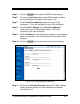
Step 7. Enter E-mail From Address (maximum length is 155
characters). This is the originator for the e-mail notification.
Step 8. Enter E-mail To Address 1 and E-mail To Address 2
(maximum length is 155 characters each). This is the
recipient(s) for e-mail notification.
Step 9. Click on Enabled for each address to make the e-mail address
active. If unchecked, no e-mail notification will be sent to that
recipient.
Step 10. Click the
button to save the e-mail account settings.
Figure 4-16: E-Mail Settings for Accounts
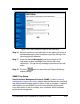
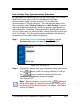
Step 11. Click on the Time Sync Event(s) tab and the E-Mail Settings
screen to select event(s) for email notification will appear
(see Figure 4-17).