
Installation and Operation Guide


4-18 TS-3000i Web Clock Installation & Operation Guide
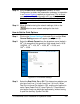
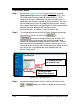
Step 5. Enter the Host Name/IP Address for the time server
(maximum length is 50 characters).
Step 6. You MUST
click the Enabled box for a time server to be used.
Step 7. Press the “Test Time Sync” button to connect to the Time
Server using the settings. This tests whether the connection is
good or bad (i.e., wrong host name/IP address).
Step 8. Click the
button to save the new time server
information.
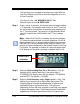
DNS Server Setup
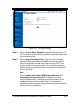
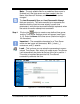
Step 1. Click on the DNS Servers link under Time Sync, and the DNS
Servers Settings screen will appear displaying the four (4)
default public DNS servers (see Figure 4-14).
Step 2. Enter Domain Name (default = local as Zero Configuration
uses dot local).
Step 3. To define your own DNS Server, highlight the desired IP
Address and enter your IP address (max. = 46 characters).
Amano recommends using DNS Server 1 for your first DNS
Server IP Address, using DNS Server 2 for your 2
nd
DNS
Server IP Address, and so forth. This is because the clock will
use the DNS Servers in appearance order. Therefore, it is
recommended to leave the servers you are not using blank.
Note
– The Domain Name System (DNS) is a hierarchical
naming system for computers, services, or any resource
participating on the Internet. It associates information with
domain names assigned to such participants. Most importantly,
it translates humanly meaningful domain names to the
numerical (binary) identifiers associated with networking
equipment for the purpose of locating and addressing these
devices world-wide.
An often used analogy to explain the Domain Name System is
that it serves as the "phone book" for the Internet by translating
human-friendly computer hostnames into IP addresses. For
example, www.amano.com translates to 38.227.249.10.
Step 4. Click the button to save your DNS Server information.