
Installation and Operation Guide


4-14 TS-3000i Web Clock Installation & Operation Guide
Important –
Only uppercase characters will be printed.
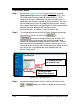
Every time you enter text or a symbol, and press the Add Text
or Add Symbol buttons that is considered a “row” which
appears in the row box. A maximum of 10 rows will be
accepted. Trying to save a print line with greater than 150 dots
will generate the error message; “Symbol is invalid,
exceeded the maximum length”.
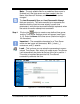
If you make a mistake entering text and/or symbols you must
press the
button to clear the Message and row
display and re-enter your desired print.
How to Set Time Synchronization
The following procedures for Time Sync Settings, Time Servers, and
DNS Servers can be used to setup custom parameters for time validation
to ensure your TS-3000i is accurate and meets your requirements. For
example, an internal Time Server could be configured instead of one of
the default time servers which require Internet access.
Time Sync Settings
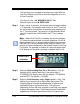
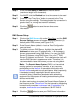
Step 1. Click on the Settings link under Time Sync and the Time
Sync Settings screen will appear (see Figure 4-11).
Step 2. Select the Sync Type: Auto Sync (default) or ATVS Software
Sync from the drop down menu. ATVS Software Sync should
only be checked if you are using the TS-3000i with ATVS
Software. When ATVS syncs with the clock, it will
automatically reset the Sync Type to ATVS Software Sync. If
you wanted to disable the ATVS sync, you would have to
change this setting back to Auto Sync.
Note
– See Chapter 6 on TS-3000i and ATVS Software for
details on ATVS software use with the TS-3000i.
Step 3. Enter the Max Deviation that is acceptable to synchronize the
clock. The maximum deviation is the difference in time
between the clock and the time server. The range is 0 to
90000 milliseconds with a default = 3000 milliseconds (3
seconds). However, Amano recommends not setting below
400 milliseconds due to normal inherent network latency.