
Installation and Operation Guide


TS-3000i Web Clock Installation & Operation Guide 4-13
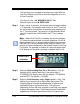
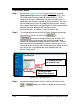
Step 10. To enter symbols, select the desired symbol from the
dropdown menu, select Regular or Bold from the dropdown
menu, and click the
button. The new message
will appear in the “Message:” display field and the row box on
the right (see Figure 4-10). If you need to correct an error, click
the
button to clear the Message display field.
Note
– If you have added a symbol and press the
button the Symbol field will NOT be cleared
. Just the Message
filed will be cleared.
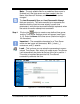
Step 11. Click the
button to retain your print style in the
clock for line 1
. The default for line 1 = FINRA settings
(see Figure 2-16).
Step 12. If a print style is desired for line 2
, click on the “Line 2” tab and
a similar screen will appear to define print for line 2. Follow the
same procedure to define Line 2, and click on the
button to retain print style for line 2 in the clock.
The default for Line 2 is the clock IP/MAC address.
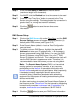
Figure 4-10: Print Lines 1 & 2
Rows –
each line
= 1 row.
Message
Field
Press
Clear All
to start
over.
Enter Text
Select Symbol