
Installation and Operation Guide


4-12 TS-3000i Web Clock Installation & Operation Guide
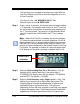
The Nth #: field selection will make the automatic number
increment or remain constant. For example, if a value of “1” is
entered, the number will increment by one after each print. If a
value greater than “1” is entered, the TS-3000i Web Clock will
print the same number that many times before incrementing to
the next number. For example, if a value of “3” is entered the
same number will be printed three (3) times consecutively,
then the number will increment by one for the next three (3)
printouts, and so on.
Note
– For OATS compliance this numbering should not be
used on line 1.
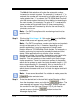
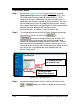
Step 8. Click on the Print Lines 1 & 2 link under Print, and the Print
Lines 1 & 2 screen will appear (see Figure 4-10).
Note
– For OATS compliance, custom print styles and symbols
should not be used on line 1. However, depending on the
specific application, it may be necessary to identify each
location where a TS-3000i Web Clock resides. For example, a
location code may be required to precede the date and time
stamp. Other applications may require a floor number,
department number, job number, workstation code, bank teller
number, trader code, branch name or any other unique
identifier. You can create up to two custom print lines using a
similar procedure. There is a maximum number of characters
which can be printed on each line (total allowable length = 150
dots or approximately 21 characters). Also, a maximum of 10
rows can be added. See Appendix A for a character table
which shows character size as a % of dots for regular and bold
characters.
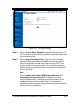
Note –
Lines cannot be edited. If a mistake is made, press the
button and start over.
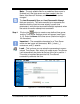
Step 9. Enter the desired text in the text field, select Regular or Bold
from the dropdown menu, and click the
button. The
new message will appear in the “Message:” display field and
the row box on the right (see Figure 4-10). If you need to
correct an error, click the
button to clear the
Message display field.