
Installation and Operation Guide


4-6 TS-3000i Web Clock Installation & Operation Guide
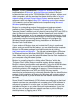
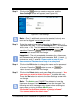
Normal Login
Once a user login has been established, enter your case sensitive
Username and Password, then press the
button (see Figure 3-4).
If there is any mismatch, an error message will be displayed.
Press the
button to clear the current Login information and enter
a different user. The following error message will appear when entering
an invalid username/password; “Invalid username or password.
Please try again.”
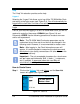
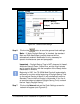
How to Custom Configure the TS-3000i Web Clock
The Settings function under Clock is used to configure each TS-3000i
Web Clock to your preference for: Time Zone, time format for display and
transaction reports, daylight savings, and network access.
Network access can be configured by selecting DHCP, a fixed IP
address, domain name, and/or enable Zero Configuration.
Step 1. After you have logged in, click on the Settings link under
Clock
, and the Clock Settings screen for general settings will
appear (see Figure 4-4).
Step 2. Select the appropriate Time Zone from the dropdown menu
(see Figure 4-4). The default = EST. The Time Zone selected
controls the Time Zone adjustment sent to the clock. If OATS
compliance is necessary, the Time Zone must be set to the
default of (GMT-05:00) Eastern Time (US & Canada).
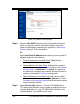
Step 3. Click on 12 hour (AM/PM) or 24 hour (Military) (default =
military) to set the display format. This format will also be used
on transaction reports.
Step 4. Select to show either the day of the month or seconds on the
clock display (default = seconds).
Step 5. Check whether or not daylight savings should be applied. This
option should only be un-checked in areas where DST is not
used and OATS compliance is not required. Select the week,
day, and month of the Start and End dates from the dropdown
Start and End times (hour/minute). Default = DST enabled.