
Installation and Operation Guide


TS-3000i Web Clock Installation & Operation Guide 4-5
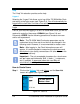
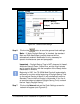
Step 2. Click on the button to create a new user, and the
User Settings screen will appear (see Figure 4-3).
Figure 4-3: User Settings
Note – One (1) additional user can be created, but only one
user can be logged in at a time
per clock.
Step 3. Enter the required user field information for Name (min. = 4
characters with max. = 20) and Password (min. = 4 characters
with a max. = 30). The Username and Password are case
sensitive. Press the button to save, or to
return to main screen with no change.
Important – The only acceptable characters for a Username
and Password are ‘a-z’ upper and lowercase, ‘0-9’, (-) dash, (_)
underscore, and (*) asterisk. Please make a note of your
Username and Password and keep in a safe place.
Step 4. Click on the Edit button to change the name and/or password
of a user. Press the
button to save, or to
return to main screen with no change.
Step 5. Click on the Delete button and press Yes at the prompt – “Are
you sure you want to delete this user?” to delete the user.
Press the No button to return to the User Settings screen with
no change.
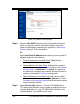
Note
– The Admin user CANNOT be deleted or have the
Username changed, but the Password can be changed! The
following red error messages may appear when entering too
many users, or trying to delete Admin user:
“Exceeded the maximum number of user(s) allowed.”
“You cannot delete the Admin user.”