
Installation and Operation Guide


3-8 TS-3000i Web Clock Installation & Operation Guide
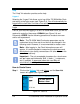
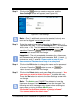
Step 12. To setup Time Sync, Report, and Backup schedules, click on
the Schedules link under Scheduling
, and the Schedule List
screen will appear (see Figure 4-20).
From the Schedule List screen, click on the
, or
buttons to add or edit a schedule and the Schedule
Settings setup screen will appear. Define the Schedule, and
click on the
button to retain the schedule in the clock
memory.
Look –
Skip Step 12 if the 2 default time sync schedules are
sufficient and no backup and report schedules are required.
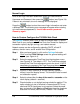
Important –
Your clock comes with two (2) default Time Sync
schedules which can be customized and/or deleted. However,
the clock must have at least one defined schedule to maintain
time validation.
Note – At a pre-determined time of the day and day of the
week, the TS-3000i Web Clock can be set to confirm or
validate that a time/date synchronization signal has been
received. This is called time synchronization or “Signal
Validation". This time validation is controlled by setting up
schedules as described in How to Setup Time Synchronization
Schedules in Chapter 4.
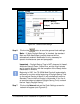
Congratulations – You have finished customizing the configuration of
your TS-3000i clock!! All of your settings have been saved in the clocks
flash memory. It is recommended to make a backup of your settings
(see Figure 4-23: Backup Utility) with the Backup Utility. A backup file
could be used, if required, to reload all these settings with the Restore
Utility.
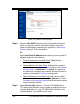
Note – The Backup/Restore Utility can also be used to create
a shared “ATVSConfig.bin” file to replicate a copy of the setup
of one clock to another TS-3000i Web Clock (for additional
information, see Performing Backup and Restore). Also, see
the TS-3000i Utility CD that is included with your clock, which
can be used to “get selected clock configuration.”