
Installation and Operation Guide


TS-3000i Web Clock Installation & Operation Guide 3-7
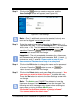
Look – Skip Step 7 if the default time servers are acceptable.
Step 8. From the Time Server List, highlight the desired time server in
the list, and click on the
or buttons
to change the time server order for use. Any new custom time
server will appear at the top of the list ahead of the defaults.
Note – Click the “Test Time Sync” button to check the
connection with a Time Server. A good procedure to verify
settings, etc
Look – Skip Step 8 if the default time server order is
acceptable.
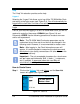
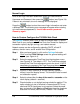
Step 9. To define custom DNS Servers, click on the DNS Servers link
under Time Sync
; the DNS Server Settings screen will appear
to display the four (4) default public DNS servers (see Figure
4-14). If necessary, enter new DNS Server information. Click
on the
button to save custom DNS Time Server
settings.
Look – Skip Step 9 if the default DNS server settings are
acceptable.
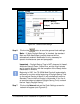
Step 10. To define e-mail notification for Backup, Report, and/or Time
Sync transactions, (i.e., a clock failure to synchronize with a
specific time server), click on the E-mail link under Notification
,
and the E-Mail Settings screen will appear with the SMTP tab
(see Figure 4-15). Click on the
button to save e-mail
settings.
Look – Skip Step 10 if notification of clock transactions is not
required.
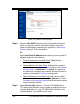
Step 11. To define Simple Network Management Protocol (SNMP)
Traps which notify a network administrator of significant events
via SNMP messages, click on the SNMP Trap link under
Notification
, and the SNMP Trap Settings screen will appear
(see Figure 4-19). Click on the
button to save SNMP
settings.
Look – Skip Step 11 if SNMP Traps are not required. The
method of SNMP trap notification, i.e., instant messaging, is
completely user controlled and has nothing to do with the clock.
See your network administration for assistance.