
Installation and Operation Guide


TS-3000i Web Clock Installation & Operation Guide 3-5
First Time Set up of the TS-3000i Web Clock
Note – The TS-3000i Web Clock configuration parameters can
be customized at any time and do not have to be done in the
following order. Amano recommends setting up these
parameters to obtain the full potential from you clock.
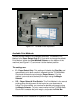
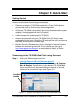
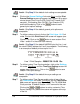
Step 1. Log into the TS-3000i Web clock (see Figure 3-4) and Click on
the Settings link under Users
, and the Users List screen will
appear (see Figure 4-2). Create a new user with a unique
Username and Password and store this information in a
secure place. Click on the
button to save the new
username and/or password in the clock’s flash memory.
Look – Skip Step 1 if a new User is not desired.
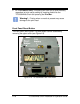
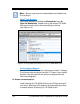
Step 2. Click on the Information link under Clock
, and the Clock
Information will appear (see Figure 3-5). It is recommended to
change the name to suit your nomenclature (default name =
ts-3000i_MAC). See Figure 3-4 for an example of a default
clock name.
Important – The acceptable characters for clock name are ‘a-
z’ upper & lowercase, ‘0-9’, (-) dash, (_) underscore, and (*)
asterisk. Uppercase letters will automatically be changed to
lowercase.
Enter a unique clock description that might, for example,
describe where the clock is located. All other fields on this
screen are read only. Click on the
button to save your
custom clock name and description.
Look – Skip Step 2 if the default clock name and no description
are acceptable.
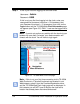
Step 3. Click on the Settings link under Clock
, and the Clock
Settings screen for general settings will appear (see
Figure 4-4). Select the appropriate Time Zone from the
dropdown menu, select 12 hour (AM/PM) or 24 hour (Military =
default setting) for the display and transaction format. Select if
seconds or date will be displayed. Check whether or not
daylight savings should be applied. Enter the Start and End
DST dates/times if DST applied. Click on the
button to
save custom general clock settings.