
Installation and Operation Guide


TS-3000i Web Clock Installation & Operation Guide 2-15
The First Printout
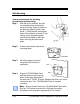
Please verify the following before attempting to print:
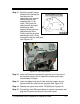
Step 1. Is all the packaging material removed from inside the clock?
Step 2. Is the FPR battery connected? (optional)
Step 3. Is the cover securely on the clock?
Step 4. Is the TS-3000i Web Clock connected to a network connection
(Ethernet RJ-45)? This step is not required to perform a test
printout when first installing the TS-3000i Web Clock.
Step 5. Is the TS-3000i Web Clock plugged into an AC wall outlet?
(skip this step if equipped with optional PoE).
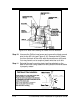
Once you have verified these items, insert a sheet of paper to make a
test print. As shipped from the factory, the TS-3000
i Web Clock will print
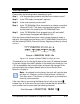
with the following FINRA (Financial Industry Regulatory Authority) format
on line 1:
YYYY
/
MM
/
DD hh:mm ss
s
Four digit Year
Two di
g
it Month
Two digit Date
24 Hour:Minutes
Seconds
Seconds
Indicato
r
Sample = 2008/07/08 18:30 15s
Figure 2-16: Sample of Default FINRA Print Style for Line 1
The default for line 2 is the last 9 digits of the clock’s IP address followed
by the last 6 digits of the MAC address. If the default print format for Line
1 & 2 is acceptable, the print style does not have to be changed! If the
print style has to be changed, please refer to How to Set the Print
Options in Chapter 4.
Note
– As shipped from the factory the clock will have the date
and time in it. However, until the clock performs it’s Start Up
Time Sync with a Time Server on initial power up, the date and
time may not be accurate.
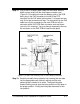
If the clock fails to sync during the Startup Sync it will print a block (█)
instead of an “s” at the end of a print line to indicate that this failed time
sync condition has occurred (see the following example).
Print Example = 2008/07/08 18:30 15█