
Installation and Operation Guide


2-14 TS-3000i Web Clock Installation & Operation Guide
Wall Mounting
Amano recommends the following
procedure for wall mounting:
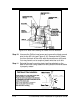
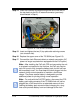
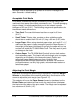
Step 1. With the cover removed, the wall
mount plate can be removed by
using your index finger as shown to
pry open the bottom portion (see
arrow 1). Slide the wall mount plate
down in the direction of arrow 2. Use
caution not to disrupt the power
and Ethernet cables on the back
when removing the wall mount
plate.
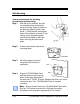
Step 2. Knock out the three holes in the
mounting plate.
Step 3. Mount the plate on the wall
using three #10 screws or
equivalent.
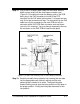
Step 4. Align the TS-3000i Web Clock
with the hooks on the mounting
plate. Press down and toward
the wall until a "CLICK" is heard. Replace the cover, lock it and
remove the key. Your TS-3000i Web Clock is now wall
mounted.
Note
– Be sure to wall mount your TS-3000i Web Clock within
6ft of an 110V power source and an Ethernet connection
(AC power is not required if equipped with PoE option).