
Installation and Operation Guide


TS-3000i Web Clock Installation & Operation Guide 2-13
Note – For units with the PoE/FPR option, leaving the
TS-3000i clock unplugged from a PoE terminal or without
power for more than 24 hours may create a problem with
the clock starting up (you will see “low bat” briefly appear in
the display). In this instance, the clock should be started with
the battery pack cable disconnected and the clock plugged into
a PoE terminal. Wait until the clock starts up, or displays the
time, then the battery pack cable can be reconnected and it will
charge. During this time, Amano recommends to wait for 24
hours before printing.
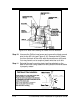
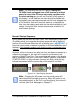
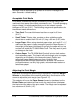
Normal Startup Sequence
During power up, the clock will flash “boot”, then sequentially display the
IP address twice, and complete the startup sequence with a display of
the time (Hours:Minutes:Seconds) with a flashing colon. IMPORTANT - if
the clock cannot make a network connection it will flash 0.0.0.0 for the IP
Address. If this happens please verify that the clock is connected to the
network!
Normally, within a minute or two after the clock has been connected to a
network and plugged in, the clock will connect to a time server and
perform a Startup Time Sync. The correct time will appear in the display
after a successful time sync. If the clock CANNOT perform a successful
STARTUP SYNC, six day indicators (cursors) will flash, while the day
indicator associated with the current day of the week will not flash.
Figure 2-15: Start Display Sequence
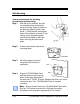
Note
– Plugging the AC power cord into a wall socket will
cause the printer carriage to move up. When AC power is not
connected properly or the PoE is not functioning, the colon will
not flash (see Error Messages in Chapter 7).