
Installation and Operation Guide


2-12 TS-3000i Web Clock Installation & Operation Guide
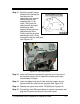
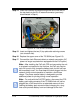
Step 14. Insert the Ethernet connector through the hole in the rear of
the top plate into the RJ-45 network connector (previously
disconnected in Step 4).
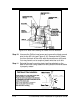
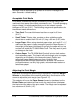
Figure 2-14: PoE & FPR Connectors
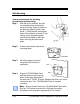
Step 15. Insert and tighten the two (2) top plate side retaining screws
(one on each side).
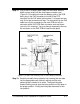
Step 16. Replace the upper cover of the TS-3000i (see Figure 2-2).
Step 17. Connect the clock Ethernet cable to a network connection (AC
power no longer required when equipped with the PoE option).
Note – After installing the PoE with FPR and connecting the unit
to a network connection for the first time, the PoE may require
up to 24 hours to fully charge the battery pack, but the unit can
be immediately used. You must keep the clock plugged into the
network during normal operation to maintain a continuous
charge. The power reserve battery is designed to provide
additional power for printing during normal operation.
Note – For units with the PoE/FPR option, disconnect the FPR
battery pack cable connector if the TS-3000i clock will not be
plugged into a PoE terminal for an extended amount of time.
Leaving the battery pack connect without charging for a long
time could promote battery harm and damage to the clock.