
Installation and Operation Guide


TS-3000i Web Clock Installation & Operation Guide 2-7
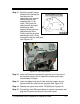
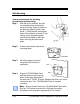
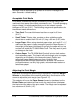
Step 11. Carefully reinstall the top
plate by first inserting the
rear tabs into the
appropriate rear notches,
making sure the rear
centering tab is in its
notch. Then push the
plate forward (see right-
hand figure) while
properly aligning the top
plate sides and front.
Finally push the top plate
downward to lock it firmly
into position with the front tabs
(see Figure 2-9).
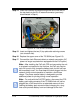
Figure 2-9: Top Plate Installed
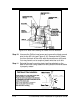
Step 12. Insert the Ethernet connector through the hole in the rear of
the top plate into the RJ-45 network connector (previously
disconnected in Step 4).
Step 13. Insert and tighten the two (2) side retaining screws (one on
right and left front sides) for the top plate (see Figure 2-9).
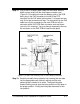
Step 14. Replace the upper cover of the TS-3000i (see Figure 2-2).
Step 15. Connect the clock Ethernet cable to a network connection and
plug the AC power transformer into a wall socket.